Forcepoint Next-Gen Firewall and AWS Security Hub
Table of contents
- Forcepoint Next-Gen Firewall and AWS Security Hub
- Summary
- Implementation
- Appendix
- Troubleshooting
License
These contents are licensed under Apache License, Version 2.0. http://www.apache.org/licenses/LICENSE-2.0
TO THE MAXIMUM EXTENT PERMITTED BY APPLICABLE LAW, THE SITE AND ITS CONTENT IS PROVIDED TO YOU ON AN “AS IS,” “AS AVAILABLE” AND “WHERE-IS” BASIS. ALL CONDITIONS, REPRESENTATIONS AND WARRANTIES WITH RESPECT TO THE SITE OR ITS CONTENT, WHETHER EXPRESS, IMPLIED, STATUTORY OR OTHERWISE, INCLUDING ANY IMPLIED WARRANTY OF MERCHANTABILITY, FITNESS FOR A PARTICULAR PURPOSE, OR NON-INFRINGEMENT OF THIRD PARTY RIGHTS, ARE HEREBY DISCLAIMED
Document Revision
| Version | Date | Author | Notes |
|---|---|---|---|
| 0.1 | 12 December 2019 | Tom Meaney | First draft |
| 0.2 | 12 December 2019 | Mattia Maggioli | Review |
| 0.3 | 17 February 2020 | Mattia Maggioli | Updated after changes to ARN |
| 0.4 | 23 March 2020 | Neelima Rai | Added troubleshooting chapter |
| 0.5 | 22 July 2020 | Neelima Rai | Added hardware requirements |
Summary
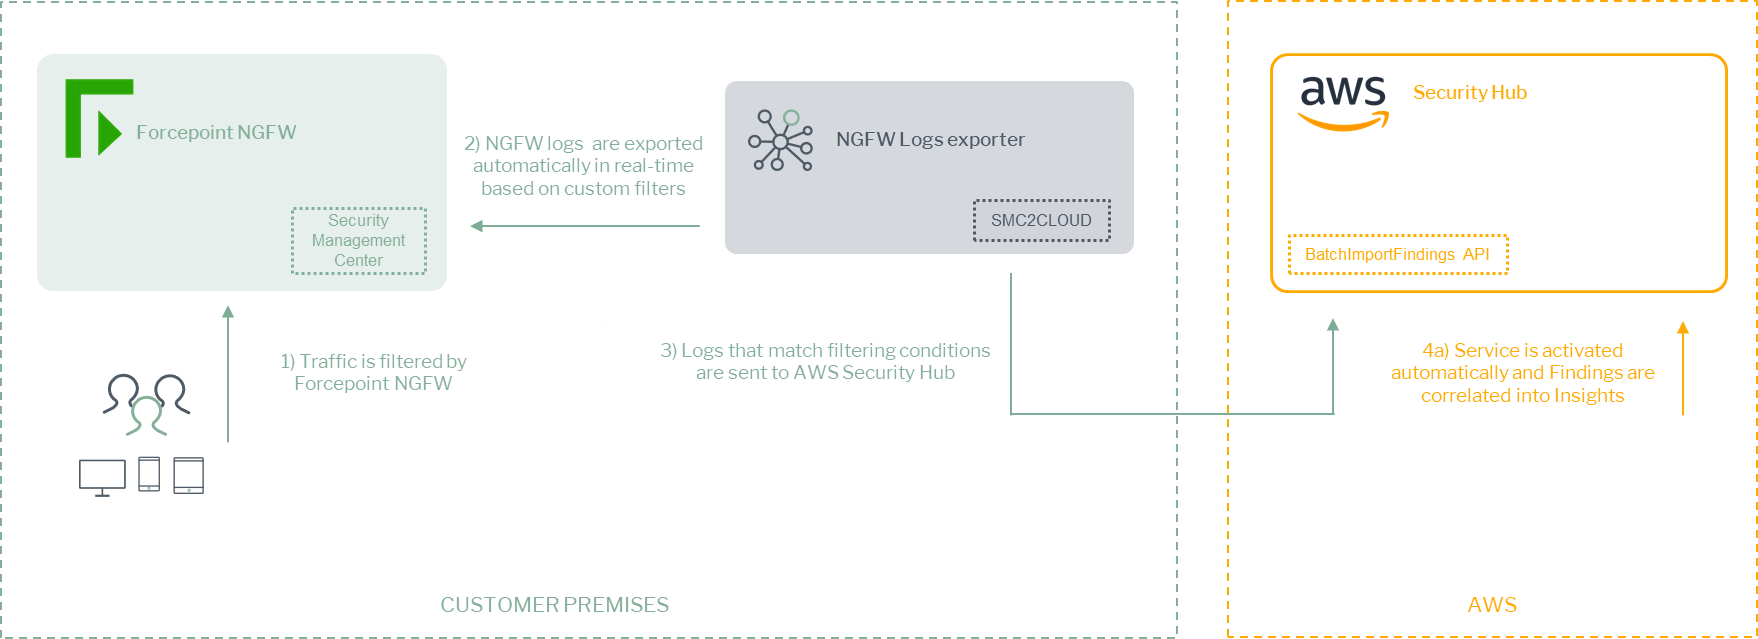
This guide provides step by step instructions to integrate Forcepoint Next Generation Firewall (Forcepoint NGFW) with AWS Security Hub and to export pertinent log data from the NGFW to AWS according to user-configured filters.
The code and instructions provided enable system administrators to automatically
-
Export log events from Forcepoint NGFW into AWS Security Hub in real-time
-
Ingest logs as “Findings” inside AWS Security Hub and group them into “Insights” using pre-defined examples created programmatically
This interoperability allows centralization of NGFW logs and events, and allows for easy curation of data using “Insights” to group “Findings” by a number of fields (e.g. Severity, type)
A description of the workflow between the components involved in this POC is depicted in this diagram:
Demo
Source Code
Caveats
These implementation instructions are tested with the following product versions
-
Forcepoint NGFW 6.5.2
-
Forcepoint NGFW Security Management Center (SMC) 6.6.0
The following activities are out of the scope of this document and therefore left to the system administrator, as part of ordinary maintenance procedures to be put in place within the existing infrastructure:
-
configuration of appropriate hygiene procedures to handle logs produced during any step of the solution workflow
-
monitoring of the scripts, services and applications involved in the solution
Implementation
The solution described in this chapter requires the following files available at this link:
https://github.com/Forcepoint/fp-bd-ngfw-aws-azure/releases/tag/v1.2
-
fp-ngfw-exporter-cloud-v1.tar.gz
The Source Code.tar.gz/.zip contains all files necessary to setup and run the SMC2CLOUD service which automatically queries, processes and uploads logs to AWS. We suggest deploying this service on an Ubuntu 18.04 machine with at least 1 GB RAM, 1 vCPU and 250 MB of free storage for the integration, the instructions provided in this document are based on this operating system and the following packages
-
Python3.x
The software packages and related dependencies are automatically installed by the install.sh script provided inside the Source Code.tar.gz/.zip file, which will execute the following commands as part of the deployment script:
python3 get-pip.py
python3 -m pip install –user virtualenv
python3 -m venv venv
source venv/bin/activate
python3 -m pip install -r requirements.txt
mkdir /opt/ngfw_2_cloud
cp -r ./* /opt/ngfw_2_cloud
cp /opt/ngfw_2_cloud/SMC2CLOUD.service /lib/systemd/system/SMC2CLOUD.service
systemctl daemon-reload
systemctl enable SMC2CLOUD
systemctl start SMC2CLOUD
Step 1 – Register a user in AWS and retrieve credentials
If you already have AWS credentials, skip this section and go to Step 2.
In order to submit logs into AWS Security Hub we need a few parameters to perform all calls using AWS BatchImportFindings API and to setup the integration:
-
Aws Account Id
-
AWS access key ID
-
AWS secret access key
-
Region name
In order to find the account ID for the account that will be used to integrate with AWS Security Hub
-
Log in to AWS console
-
Click on your username in the top right corner and select My Account, look for Account Id at the top of the page and store the ID in a safe location as it is required for configuring the service in the next steps of this guide
Then we need to create a user and retrieve the keys
-
Navigate to the AWS management console
-
Search for IAM and open it
-
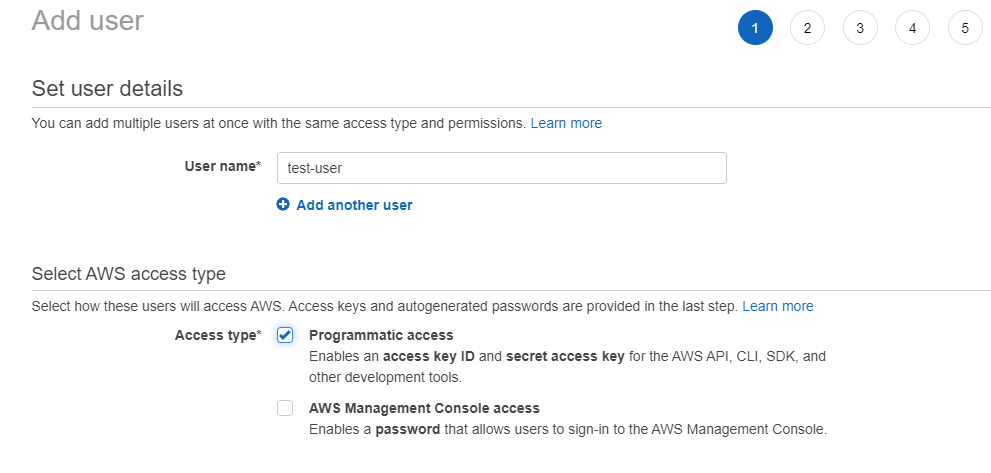
Open the Users section and Add User in the top left
-
Enter a name for the new user and select Programmatic access in the Access type section
-
Add the user to the correct group(s) that have access to AWS Security Hub
-
Add tags if required in your organization (tags are not required by this integration)
-
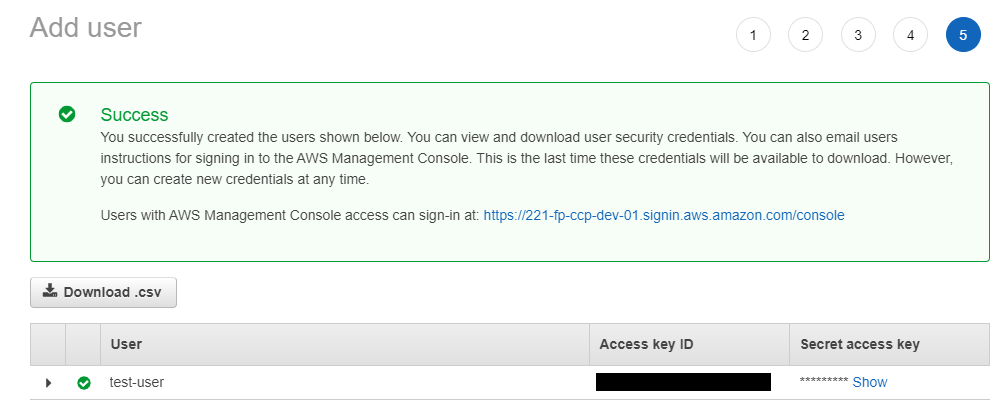
Review the details and then click Create user
-
In the next screen you will be presented with your created user along with your Access Key ID and Secret Access Key, save these or the CSV file in a secure location
Step 2 – Configure SMC to allow connection from API clients
We need to enable API access in order to export logs from the Security Management Center. The instructions to Enable SMC API can be found in the official documentation at this link:
https://www.websense.com/content/support/library/ngfw/v66/rfrnce/ngfw_660_rg_smc-api_b_en-us.pdf
Step 3 – Creating custom log filters from SMC
Since AWS Security Hub charges based on the number of Insights sent, it is important to control what logs are forwarded from the NGFW into AWS.
This integration package enables the filtering of logs based on customizable queries. Queries can be built using the SMC interface and then exported in a format that can be passed directly to the SMC2CLOUD service. By doing so, users will be able to find in AWS Security Hub the same logs they would see applying the filters in the SMC interface.
-
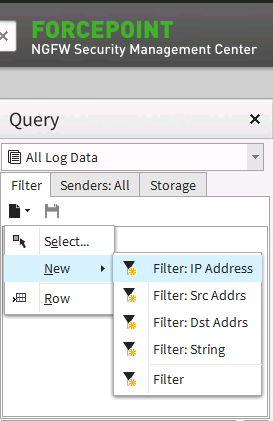
Open the SMC log view
-
Find the filter side bar and create a new filter, validate it returns what is required by clicking Apply
-
If you have two entries in the filter view after creating your filter, select both, right click them and select ‘Combine Filters’

-
After you combine the filters you will have one entry titled Combined <x> where x is some numerical value that increments after each combined filter
-
Now we need to export our filter in a format that can be used by our integration tool. Right click on the combined filter and select Show Expression Translation
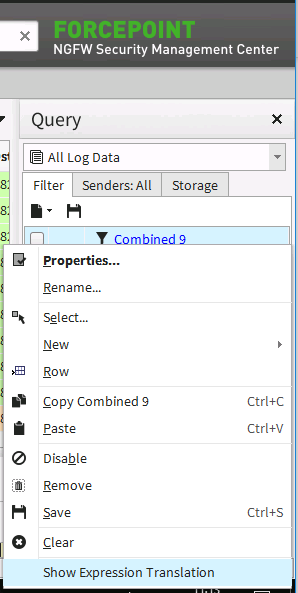
-
A dialog will pop up with a textual representation of the filters we just created
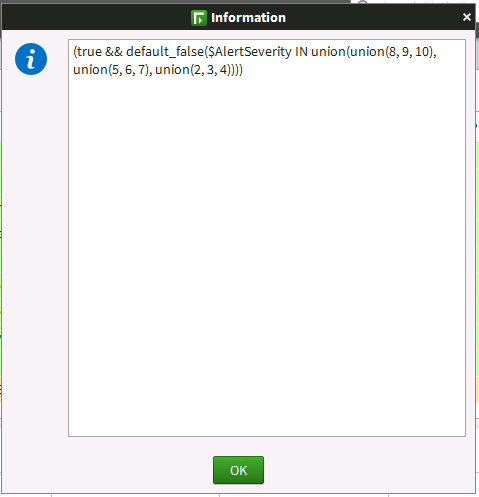
-
Copy this line of text exactly as it is in the dialog box and store it in a safe location: this will be required during the installation steps of the SMC2CLOUD service.
Example of common log queries
-
All events matching a severity of Critical, High or Low
(true && default_false($AlertSeverity IN union(union(8, 9, 10), union(5, 6, 7), union(2, 3, 4))))
-
All events matching a specific rule tag (the number in red being the rule tag)
(true && default_false((($RuleId & 0x1fffff) | (($RuleId & 0x7ffffffe00000000) >> 12)) == 2097162))
-
All events with an action matching “Terminate” or “Block”
(true && default_false($Action IN union(9, 13)))
-
Any System Alert events
(true && defined($Alert))
-
All Anomalies with severity Critical or High
((true && defined($AnomalySituation)) && default_false($AlertSeverity IN union(union(8, 9, 10), union(5, 6, 7))))
Adding extra filters
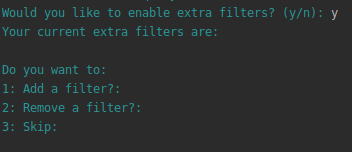
During the configuration step the install wizard will ask for a default filter, since at least one filter is needed in order to match NGFW logs that will be forwarded to AWS Security Hub. User can also add extra filters so that the filtering process can be performed in a modular way, and filters can be selectively removed at a later stage without editing the syntax of the default filter.
-
Choose ‘y’ and you will be presented with this screen
-
When you choose to add a filter, paste the filter syntax in the terminal

-
Once you have hit enter the configuration process will continue
Removing extra filters
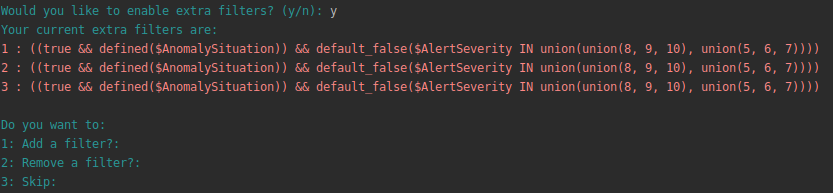
During the configuration step you will be asked if you want to add extra filters. In this case, choose y also if you want to remove existing filters
-
Select option 2 to remove a filter
-
Enter the number of the filter you want to remove
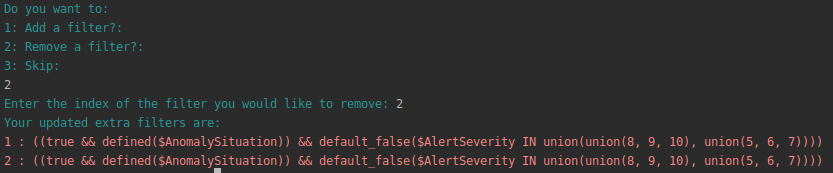
-
The filter at the selected will be deleted and the configuration process will continue
Step 4 – Configuration and installation of the SMC2CLOUD service
-
cd to the directory containing fp-bd-ngfw-aws-azure-1.x.tar.gz
-
Decompress the above file with the command tar -xvzf fp-bd-ngfw-aws-azure-1.x.tar.gz
-
There will be a new folder created with the name fp-bd-ngfw-aws-azure-1.x cd to fp-bd-ngfw-aws-azure-1.x
-
Make install.sh executable with the command chmod u+x install.sh
-
Run sudo ./install.sh
-
Fill in the requested details during the configuration step
-
Wait for the installation to complete
-
Run sudo systemctl status SMC2CLOUD.service to verify the service has been created and is running properly

Appendix
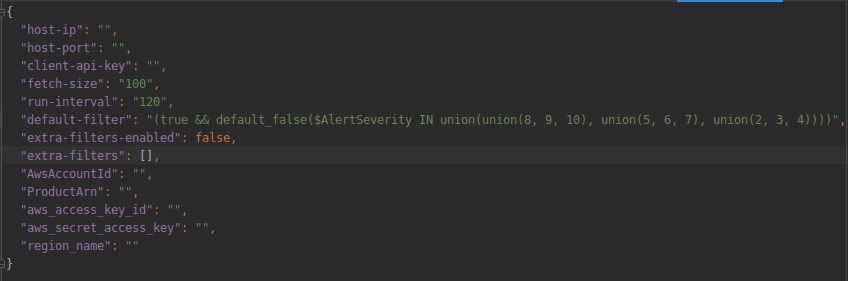
The following table provides a description of the parameters in the cfg.json file that are populated by the installer script upon it first execution:
| Parameter | Description | Required |
|---|---|---|
| host-ip | IP address of the SMC installation | YES |
| host-port | Port opened on the SMC for the API client | YES |
| client-api-key | API key from API client creation | YES |
| fetch-size | Number of records to retrieve from the SMC logs | YES |
| run-interval | How often the systemd service will run, fallback is every 900 seconds (15 mins) | NO FALLBACK |
| default-filter | Default log filter exported from the SMC | YES |
| extra-filters-enabled | True/False, dependent on customer config | YES |
| extra-filters | Array of additional filters added as well as the default filter | NO |
| AwsAccountId | Customer’s AWS account ID | YES |
| aws_access_key_id | Identifier for the AWS access key | YES |
| aws_secret_access_key | Secret key for the AWS user | YES |
| region_name | AWS region name chosen for the integration with Security Hub | YES |
The file will be created and populated by the installer script.
Troubleshooting
Follow these steps to identify issues impacting the normal operation of the integration described in this document.
Validate the prerequisites
Make sure the prerequisites described in the Summary chapter are all satisfied:
-
Check the versions of Forcepoint NGFW and SMC in use are listed as compatible:
Forcepoint NGFW 6.5.2 Forcepoint NGFW Security Management Center (SMC) 6.6.0 -
Verify the integration component correctly operates on a clean Ubuntu 18.04 machine with at least 1 GB RAM, 1vCPU and 250 MB of free storage for the integration
-
User must be root to run the installer.sh
-
Check the user can download the files necessary to install SMC2cloud service: execute the following command
wget –content-disposition https://frcpnt.com/ngfw-sentinel-latest
Check network connectivity
Make sure firewalls or other security appliances are not impacting the network connectivity necessary for the operation of all components involved into this integration:
-
Check the host machine has network connectivity to NGFW-SMC: execute the following command
ping -c 5 <smc-ip-here>
and check the ping is successful
-
Check the host machine also has network connectivity to AWS: execute the following command
ping -c 5 <aws-ip-here>
and check the ping is successful
Check dependencies are installed
Make sure the software dependencies needed by the components involved into this integration are installed:
-
Check the python versions installed on the host Ubuntu machine with the following commands:
python –version
python3 –version
and check the result has both python 2.x and python 3 versions on the host Ubuntu machine
-
Check SMC2CLOUD.service is installed: execute the following command on the Ubuntu machine
systemctl status SMC2CLOUD.service
and check the result is similar to below:

-
Check omsagent service is installed: execute the following command on the Ubuntu machine (user can use tab to autofill the full name for omsgent servcie)
systemctl status <omsagent-here>
and check the result is similar to below:

-
If omsagent service is not running (or has loaded status): execute the following command:
journalctl -r
to see where the install is failing. If you see any error messages with “Connection Refused” or “dpkg”, that could have something to do with the software updates on the Ubuntu machine. Restart the host machine and see if you see any software upgrade request. If you do, please install all the updates.
Once the problem is identified and rectified, it will be necessary to stop and delete the SMC2CLOUD.service with the following commands:
systemctl stop SMC2CLOUD.service
systemctl disable SMC2CLOUD.service
sudo rm /etc/systemd/system/ SMC2CLOUD.service
sudo rm /lib/systemd/system/omsagent
and check that the service is stopped with the command:
systemctl status SMC2CLOUD.service
-
The user can also make changes to the cfg.json file in the fp-ngfw folder if the input for any of the configuration parameters is wrong and then restart the service with the below command:
systemctl restart SMC2CLOUD.service
Check status of the SMC2CLOUD service with the below command:
systemctl status SMC2CLOUD.service
If the above service is running, user should start seeing logs in AWS Security Hub shortly.