Forcepoint Dynamic Intelligence Manager
Table of contents
License
These contents are licensed under Apache License, Version 2.0. http://www.apache.org/licenses/LICENSE-2.0
TO THE MAXIMUM EXTENT PERMITTED BY APPLICABLE LAW, THE SITE AND ITS CONTENT IS PROVIDED TO YOU ON AN “AS IS,” “AS AVAILABLE” AND “WHERE-IS” BASIS. ALL CONDITIONS, REPRESENTATIONS AND WARRANTIES WITH RESPECT TO THE SITE OR ITS CONTENT, WHETHER EXPRESS, IMPLIED, STATUTORY OR OTHERWISE, INCLUDING ANY IMPLIED WARRANTY OF MERCHANTABILITY, FITNESS FOR A PARTICULAR PURPOSE, OR NON-INFRINGEMENT OF THIRD PARTY RIGHTS, ARE HEREBY DISCLAIMED
Document Revision
| Version | Date | Author | Notes |
|---|---|---|---|
| 0.1 | 16 October 2020 | Mattia Maggioli | First draft |
| 0.2 | 29 October 2020 | Neelima Rai | Added Troubleshooting chapter |
| 0.3 | 16 November 2020 | Tom Meaney, Ultan Casey, Mattia Maggioli | Updates |
| 0.4 | 09 December 2020 | Jonathan Knepher | Review |
| 0.5 | 07 April 2021 | Neelima Rai, Ultan Casey | Added SWG export module |
| 0.6 | 11 August 2021 | Rabih Abou Fakher | Add Snort Rules |
Summary
This guide provides step by step instructions to deploy, configure and manage operations of Forcepoint Dynamic Intelligence Manager.
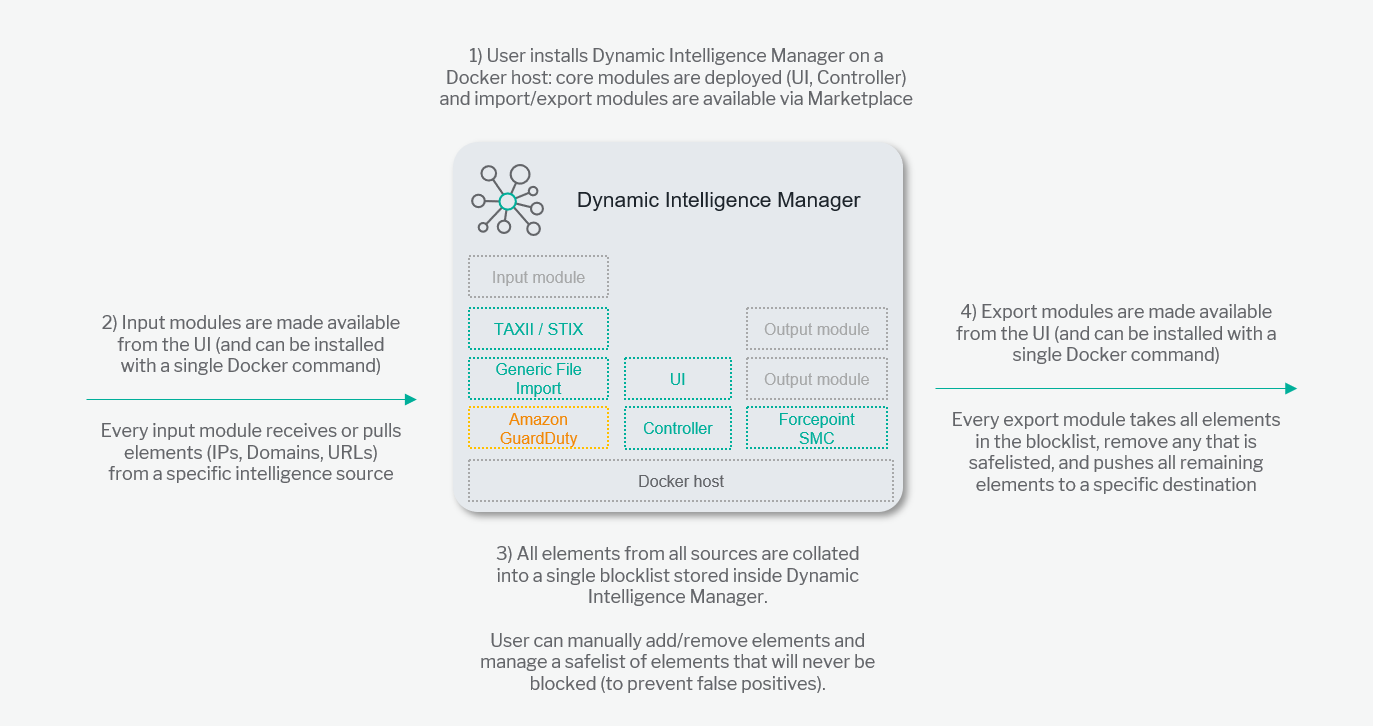
Forcepoint Dynamic Intelligence Manager is a modular solution that provides automated ingestion of security findings from multiple heterogenous sources and automated export to multiple heterogenous destinations, so that organizations can easily leverage a varied selection of intelligence and make it available across formats and products to their security devices and applications.
Elements managed by Forcepoint Dynamic Intelligence Manager are
-
Single IP addresses
-
Ranges of IP addresses
-
Domain names
-
URLs
The code and instructions provided enables system administrators to automatically:
-
Deploy Forcepoint Dynamic Intelligence Manager on any docker-based environment
-
Configure the existing modules so that common intelligence sources can be used to import elements into Forcepoint Dynamic Intelligence Manager
-
Perform long-term maintenance tasks of Forcepoint Dynamic Intelligence Manager
-
Develop custom modules that can be used locally with Forcepoint Dynamic Intelligence Manager
A description of the architecture and workflow of Forcepoint Dynamic Intelligence Manager is depicted in this diagram:
Technologies
Forcepoint Dynamic Intelligence Manager was developed and tested using the following technologies:
-
Ubuntu 18.04
-
Docker 19.03.6 and Docker-compose 1.22.0
-
Vue CLI version 4.3.1
-
Nginx 1.19.2-alpine
-
MariaDB
-
Let’s Encrypt
-
Git 2.4.3
Requirements
This implementation requires the following resources:
-
fp-dim.tar.gz archive available at this link: https://frcpnt.com/fp-dim-latest
-
2 CPUs and 2 GB of RAM as minimum hardware for the docker host
-
An existing docker host with Docker and Docker-compose, Ubuntu recommended
The following network requirements:
-
Connectivity to docker.frcpnt.com and to the intelligence sources and destinations configured in the modules.
-
Appropriate firewall rules and DNS configuration to allow connectivity to the hostname assigned to Dynamic Intelligence Manager on port 443/TCP (web interface) and port 9000/TCP (ingestion endpoint of input modules).
-
For import modules which receive intelligence from external sources, the DNS name assigned to Dynamic Intelligence Manager must be resolvable from Internet with a public IP, so that external services can resolve the DNS name into the public IP and send data to it. On the organization network, firewalls and routers must be configured to forward traffic on port 9000/TCP to the internal IP address assigned to Dynamic Intelligence Manager.
In a production environment, traffic to Dynamic Intelligence Manager on port 443/TCP should only be allowed from trusted networks, to provide access to the web interface of Dynamic Intelligence Manager for daily operations and management purposes. Inbound traffic to port 9000/TCP must be allowed from:
-
Pre-defined addresses if all intelligence sources have static source IPs.
-
Any source if input modules receive data from external sources whose findings are sent from IP addresses changing dynamically (e.g. Amazon GuardDuty).
In a test environment, users who opt for 90-day certificates created and signed by Let’s Encrypt during the installation stage must also allow inbound traffic to port 80/TCP and 443/TCP. This is used by Let’s Encrypt to validate the hostname of the certificate during the certificate signing process.
-
Input traffic to port 80/TCP and 443/TCP must be allowed from any source but is only needed during the installation and renewal of the SSL certificates.
-
These firewall rules should be disabled during normal operations of Dynamic Intelligence Manager.
Installation
Forcepoint Dynamic Intelligence Manager is deployed using docker-compose, which automates the entire procedure provided all parameters are set within the docker-compose.yml file to match the user environment.
-
Login to your docker host. If the user used to log in does not belong to the docker group, add it with the command
sudo usermod -aG docker $USER
and reload the SSH connection.
-
Login to docker.frcpnt.com using the command
docker login docker.frcpnt.com
and the credentials
-
Username: fp-dim-user
-
Password: BVQL7ABrFrCM8hk
-
-
Create a folder named DIM as root location for the deployment.
-
Move into the DIM folder and create another folder named controller. Move into the controller folder.
-
Download the archive fp-dim.tar.gz and unpack it into this location with the commands
wget --content-disposition https://frcpnt.com/fp-dim-latest && tar -xzvf fp-dim.tar.gzThe files docker-compose.yml and init.sh will be extracted from the archive.
-
Edit all required fields in docker-compose.yml with the values matching your environment. A description and example for each field in the docker-compose.yml is available in the following table.
Parameter Example Description Requires to be changed MYSQL_DATABASE dim-master Name of the database created during the deployment of Dynamic Intelligence Manager No MYSQL_USER dim-master User created automatically during deployment stage, used to connect to the Dynamic Intelligence Manager database No MYSQL_PASSWORD master Password used by the Controller module to authenticate to the database No HOST_DOMAIN dim.example.local FQDN or IP address on which the Dynamic Intelligence Manager is being run.
The FQDN must be resolvable from Internet for input modules to receive findings generated by external services.
If an IP address is entered, SSL certificates for the web interface must be provided by the user.
Yes CONTROLLER_SVC_NAME dim-controller Service Name for the Dynamic Intelligence Manager within the docker network. This is defined within the docker-compose.yml file No CONTROLLER_PORT 8080 Internal local port of the controller within the docker network No DEBUG_MODE "false" Enable or disable debug mode within the Controller module, this can be used to allow traffic from any origin (CORS) No PROJECT_ROOT /path/to/dim-folder Directory in which the Dynamic Intelligence Manager and all sub modules files should be stored. Yes DOCKER_USER fp-dim-user Username used to connect to docker.frcpnt.com to retrieve the required images to deploy Dynamic Intelligence Manager locally No DOCKER_PASSWORD BVQL7ABrFrCM8hk Password used to connect to docker.frcpnt.com No DOCKER_REGISTRY docker.frcpnt.com Address of the Forcepoint docker registry which provides the docker images of Dynamic Intelligence Manager No DOCKER_PREFIX docker.frcpnt.com/fp-dim/ Namespace of the Dynamic Intelligence Manager docker images No MODULE_NETWORK_NAME module-net Docker network on which all modules connect No DB_BACKUP_DIR /backups/ The directory in which automated and manual backups of the Dynamic Intelligence Manager are stored No DB_BACKUP_FILE dump.sql The file used to store backup data of Dynamic Intelligence Manager No DB_BACKUP_EMAIL email@example.local An email address used to commit backups within Dynamic Intelligence Manager. Yes DB_BACKUP_NAME Joe Bloggs Name of the user associated with the backup. Yes LOG_LEVEL info The level of logging for the Dynamic Intelligence Manager No LOG_FILE log.txt The file used to store log messages of Dynamic Intelligence Manager. No -
Once all required fields are edited, run the following commands:
sudo chmod +x init.sh
./init.sh
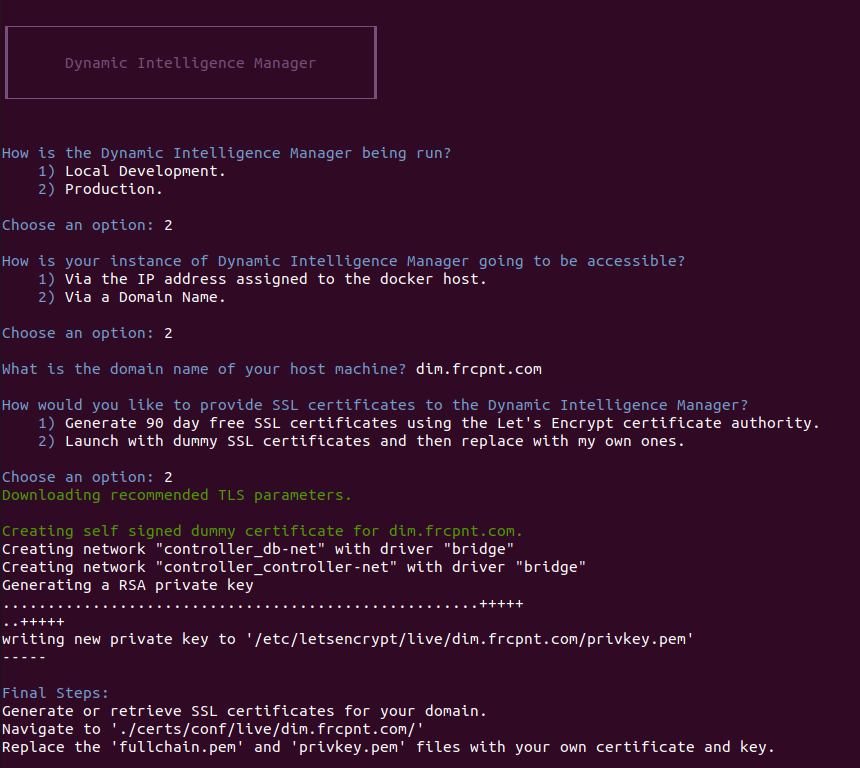
The command executes the init.sh interactive script which simplifies the deployment of Dynamic Intelligence Manager handling all deployment elements:
-
Usage type: local development test or production
-
SSL certificates: either temporary ones signed by Let’s Encrypt CA or using user-provided ones.
-
Binding: to the local IP address of the docker host or to a hostname
-
-
The first choice is the intended usage of the instance of Dynamic Intelligence Manager being deployed:
-
Local Development is for testing or development purposes (e.g. custom modules)
-
Production is for a standard installation

-
-
Next choice is about binding of the service:
-
Via the IP address assigned to the docker host: binds the Dynamic Intelligence Manager services (controller, UI, ingestion endpoint of input modules) to the local IP assigned to the docker host. If this option is selected, the user must provide the SSL certificates since the Let’S Encrypt CA can only generate certificates for FQDNs.
-
Via a Domain Name: binds the services to a domain name, prompting for the name. User must enter the same value specified in the HOST_DOMAIN parameter of the docker-compose.yml file.
-
-
Last choice is about SSL certificates:
-
Generate 90 day free SSL certificates: creates SSL certificates using the Let’s Encrypt CA. These are valid certificates typically used for development/test purposes which have 2 limitations: certificates duration is 90 days and can only be signed to FQDNs. Make sure port 80/TCP and 443/TCP are open from Internet during the installation process since Let’s Encrypt CA connects from remote to validate the hostname.
-
Launch with dummy SSL certificates: this option creates dummy certificates so that the deployment wizard can progress. User is expected to replace the dummy files with user-provided certificates, signed by another CA.
If Launch with dummy SSL certificates option is chosen, the script will create dummy files and remind the user to replace them with user-provided ones: real SSL certificates must be placed in the directory /dim/controller/certs/conf/live/<HOST_DOMAIN>/ replacing the certificate fullchain.pem and privkey.pem key files.
If Generate 90 day free SSL certificates option is choosen, the script will create valid 90 day certificates signed by Let’s Encrypt CA. During the process it will ask to share your email address: this request can be denied without impact on the certificate generation process or the functionality of the certificates. If shared, the email address will be used by Let’s Encrypt to send expiration notices as explained at this link https://letsencrypt.org/docs/expiration-emails/.
90 day free certificates can be automatically renewed as explained in the chapter Renewing the SSL certificate used in the web interface.
-
-
Once configuration of SSL certificates is completed, execute the following commands
docker-compose down
docker-compose up -d
After a short period, all docker images and required dependencies will be downloaded, installed, and initialized.
-
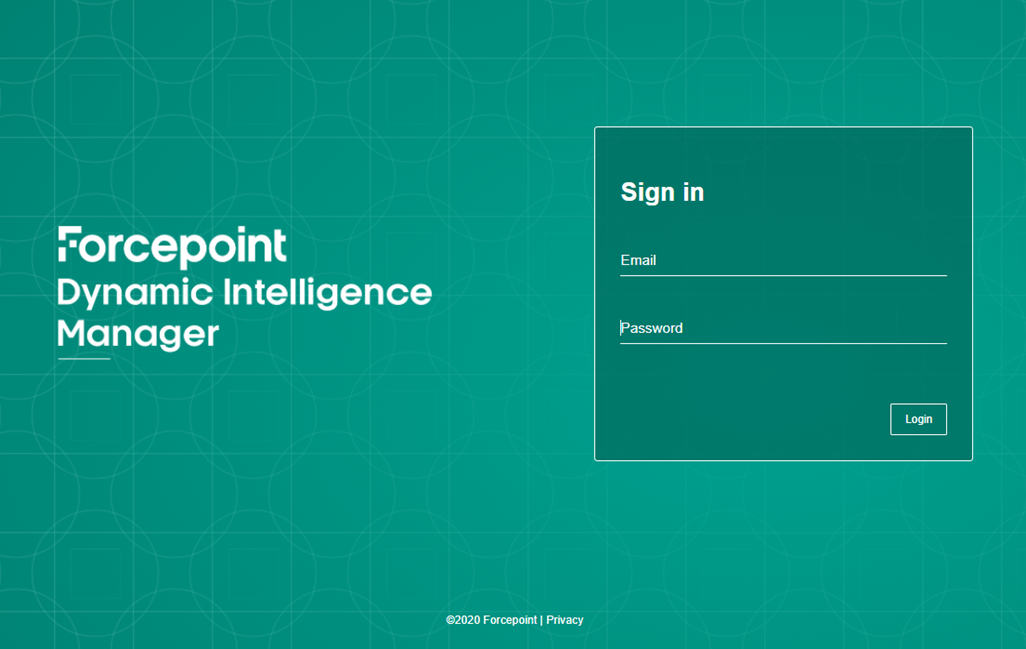
Once deployment has completed, open a browser and navigate to the URL defined for Forcepoint Dynamic Intelligence Manager in the docker-compose.yml file. In our example the URL is https://dim.example.local.
The web interface of Forcepoint Dynamic Intelligence Manager will be displayed. Default credentials admin.user@forcepoint.com and password1
Operations
Dynamic Intelligence Manager operates as an automated hub that ingests security elements from multiple sources available to the user, stores all the elements locally, provides editing capability to add/remove elements manually and exports all elements to pre-defined destinations so that intelligence is automatically shared for increased security across products and devices.
Sources and destinations across products and devices are integrated with Dynamic Intelligence Manager using modules: each module enables import or export of security findings, transforms source and destination data across formats and performs the necessary operations to exchange intelligence automatically.
Elements are exchanged using the following methods
-
Pulling data from sources (e.g. importing elements from a known source)
-
Receiving data from sources (e.g. listening for new data being sent to Dynamic Intelligence Manager)
-
Pushing data to destinations (e.g. exporting elements on a schedule)
Change password
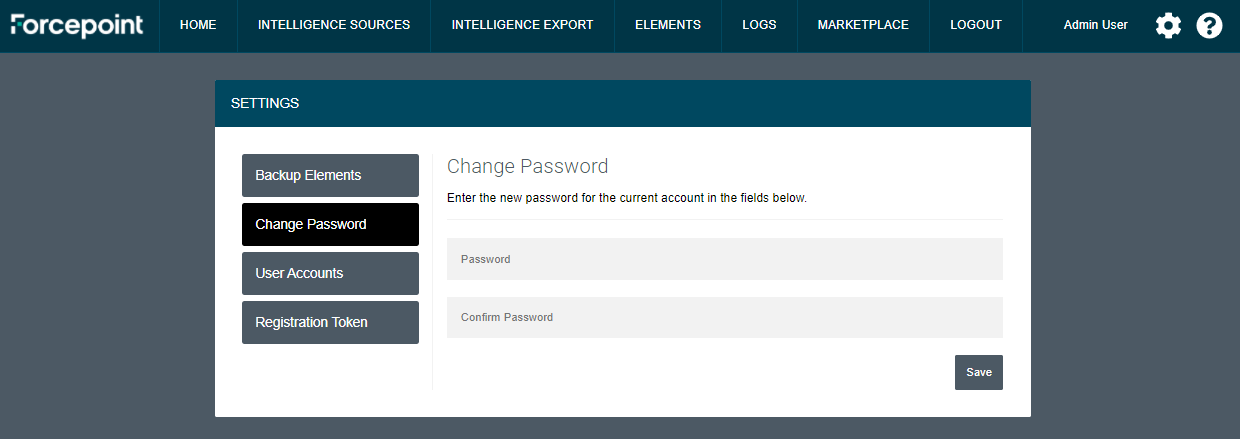
It is recommended to change password after logging into Dynamic Intelligence Manager for the first time. Users can change the password of their account by following these steps.
-
Log in using the default credentials admin.user@forcepoint.com and password1
-
Click the cog icon on the top right corner of the user interface
-
Click Change Password and enter the new password in the fields Password and Confirm Password
-
Click Save
Installing modules
All modules released by Forcepoint for intelligence sources and destinations are displayed in real-time inside the Marketplace tab of Dynamic Intelligence Manager. User-developed modules can also be used, as explained in the Appendix of this document.
Once logged into Dynamic Intelligence Manager for the first time, no modules are installed. Users are expected to install one or more input and export modules, so that intelligence sources can be connected, and elements imported are then shared.
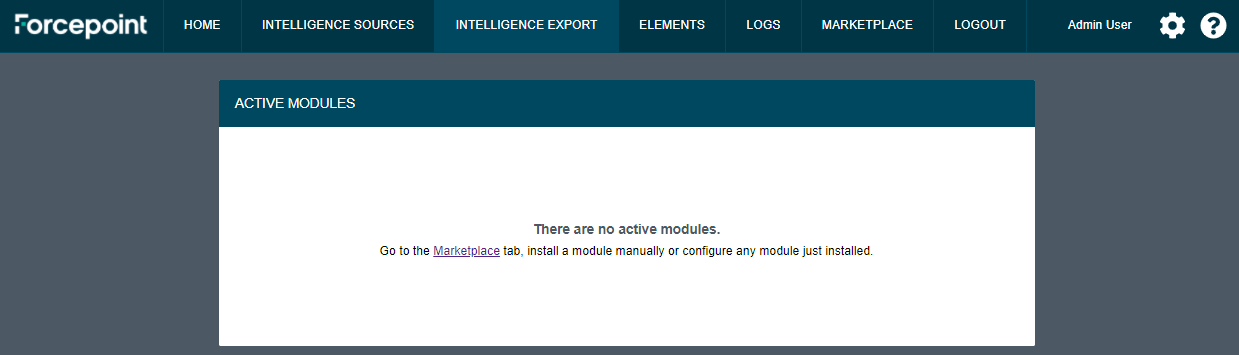
Some newly installed modules require basic configuration: once this is done modules become active and start performing their operations without further user intervention.
-
Click MARKETPLACE tab: all available modules not already installed are displayed in the SOURCE MODULES and EXPORT MODULES tabs.
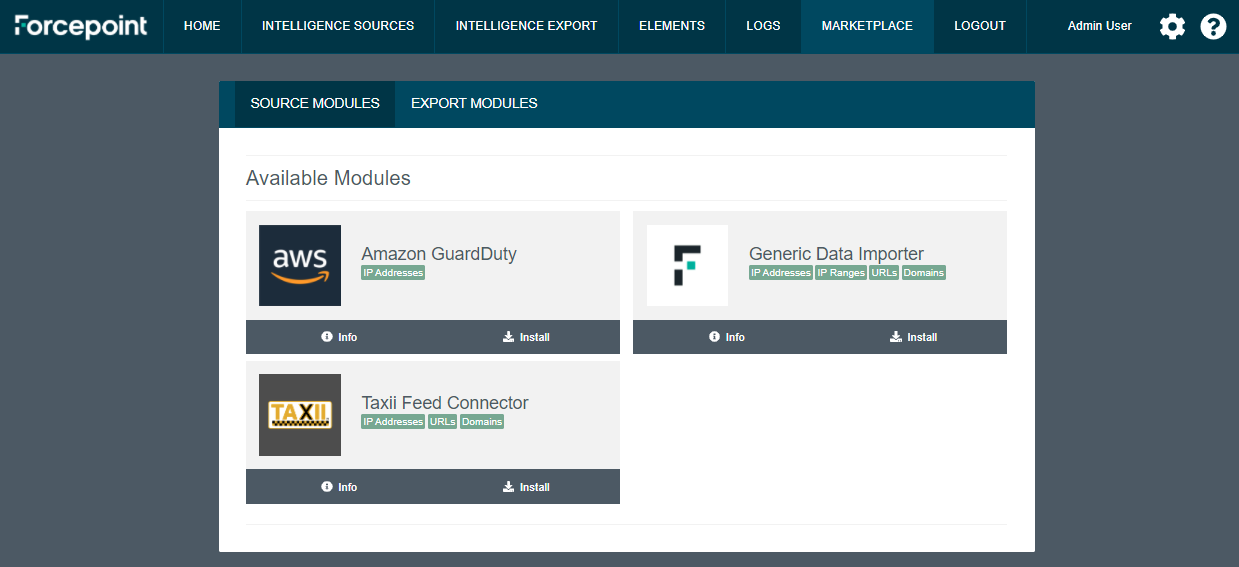
-
Click Info to display further details about the module and click Install to install the module inside the docker host.
Repeat step 2 for each module you want to install. Further details about each module are provided in the Modules chapter of this document.
-
Once all necessary modules are installed, click INTELLIGENCE SOURCES tab and the cog icon of each module to configure each installed module with the required parameters.
-
Click INTELLIGENCE EXPORT tab to configure all install modules with the required parameters.
Blocklist and Safelist
Dynamic Intelligence Manager maintains two custom lists of elements that can be used to manually add
-
Elements that will always be blocked (Blocklist), therefore elements that will be always exported to destination products and devices through any installed Export Modules
-
Elements that will never be blocked (Safelist), which prevents any element in that list to be exported to destination products and devices
The Blocklist can be used to add user-defined elements that will be exported to all destinations even though they are not present in any of the sources connected to Dynamic Intelligence Manager.
The Safelist can be used to exclude user-defined elements: if those elements are present in any of the sources connected to Dynamic Intelligence Manager, they will be filtered out before they are stored within Dynamic Intelilgence Manager, therefore they will never reach the destination products or devices.
Important notes
-
Elements received/imported from sources are looked up against the Safelist during the import stage: it is recommended to add entries to the Safelist before input modules are configured.
-
New elements can be added to the Safelist after input modules received/imported intelligence from sources. If the new elements already exist in the Blocklist, a warning message will inform the user that elements are duplicate: simply switch to the Blocklist, search for the element using the search box and click Move to Safelist button next to the element. The elements no longer blocked must be manually edited in the destination products or devices.
-
During the import stage, elements received/imported from sources are looked up against the Safelist looking for exact matches (e.g. single IP addresses are checked against IP address elements, while IP ranges are checked against IP ranges elements).
-
Wildcards are currently not supported.
In order to add elements to either list
-
In the UI of Dynamic Intelligence Manager click ELEMENTS.
-
Click the tab of the list that will store the new element.
-
Click ADD ELEMENT, select the Type of element from the drop-down menu and add the values in the Value field, then click Submit to save yout entry.

Add and remove users
New users can be created to give access to Dynamic Intelligence Manager to multiple people. All users will have full administrative access.
-
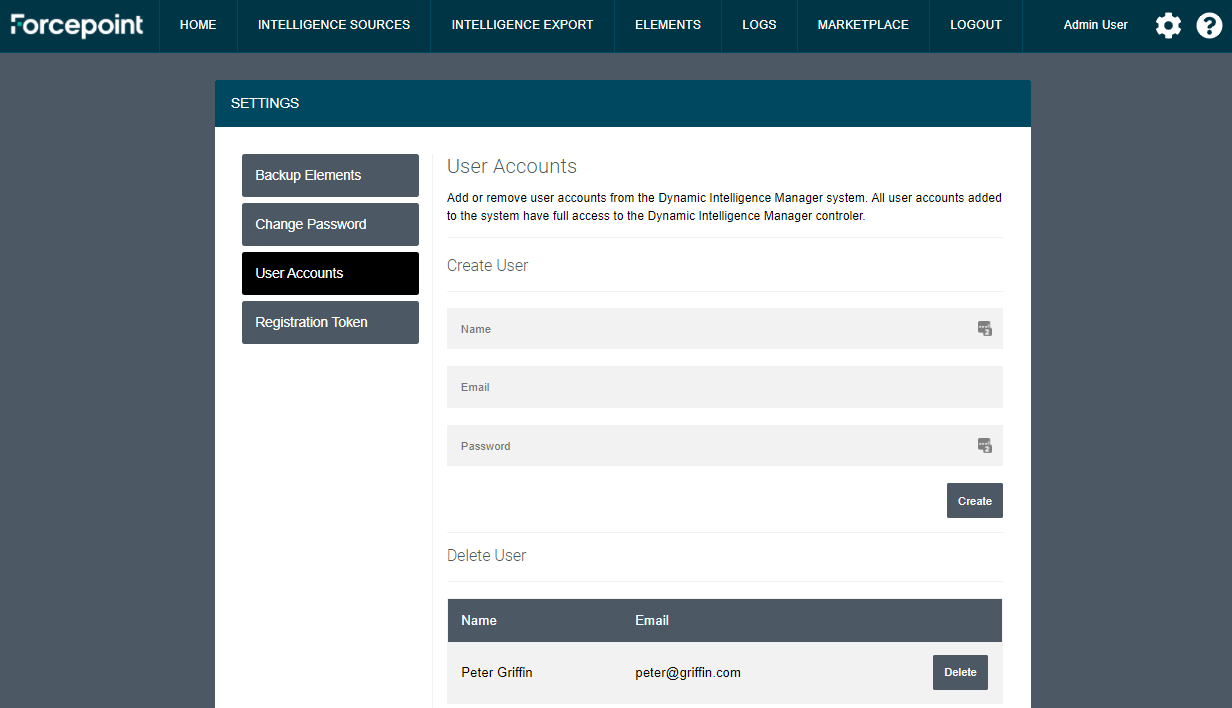
Click the cog icon on the top right corner of the user interface
-
Click User Accounts and enter all details in the Create User area of the page
-
Click Create
Existing users can be removed from the same page by simply clicking on the Delete button next to each username and clicking OK at the confirmation request.
Backup and Restore
Users can take backups of all elements stored into Dynamic Intelligence Manager, and then restore specific backups if necessary. By doing so, the full list of elements present at backup time will be restored into Dynamic Intelligence Manager, removing all the existing elements.
Backups can be taken manually and automatically, so that users can take on-demand backups if needed while automated ones are always taken at a scheduled time on a weekly basis. The last 10 backups will be listed in the UI.
-
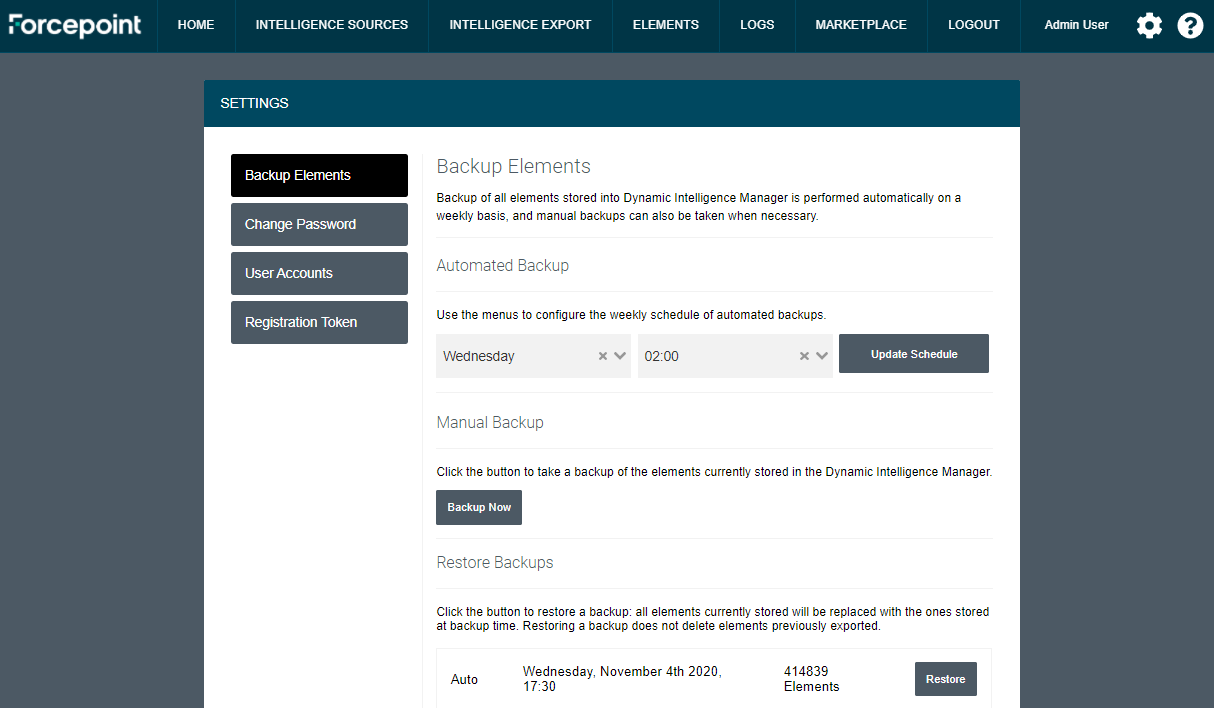
Click the cog icon on the top right corner of the user interface. The page Backup Elements is displayed by default.
-
In the Manual Backup area click Backup Now to take a backup of the entire set of elements stored within Dynamic Intelligence Manager.
-
For automated backup set the desired schedule using the drop-down menus in the Automated Backup area. Click Update Schedule to save your settings.
A backup can be restored simply by clicking on the Restore button.
Restoring a backup removes all current entries stored within the database of Dynamic Intelligence Manager, and add the ones present in the database at backup time. Intelligence elements already sent to destination will not be modified.
Renewing the SSL certificate used in the web interface
To renew the SSL certificates used by the Dynamic Intelligence Manager web interface, user must first shutdown Dynamic Intelligence Manager by running the following command:
docker-compose down
Once done, there are two options to renew the certificates based on what certificates are being used:
-
User-provided SSL certificates: replace the key and certificate files in the /dim/controller/certs/conf/live/<dim.mydomain.com>/ folder
-
Free 90-day certificates generated using Let’s Encrypt: add the following lines to the docker-compose.yml file under the certbot service:
entrypoint: [ “openssl”, “req”, “-x509”, “-nodes”, “-newkey’, “rsa:1024”, “-days’, “1”, “-keyout”, “‘/etc/letsencrypt/live/<HOST_DOMAIN>/privkey.pem’”, “-out”, “‘/etc/letsencrypt/live/<YOUR_HOST_DOMAIN>/fullchain.pem’”, “-subj”, “‘/CN=<YOUR_HOST_DOMAIN>’” ]

New free 90-day certificates will be created at every boot of Dynamic Intelligence Manager, so that renewing certificates requires only to restart Dynamic Intelligence Manager: we recommend scheduling a docker restart at least once a month.
Complete the process of renewing the SSL certificates run the following command:
docker-compose up -d
Modules
All modules developed by Forcepoint are available in real-time via an online feed which displays them in the MARKETPLACE tab of Dynamic Intelligence Manager.
Configuration for each module is managed by the user via the web interface, with some modules requiring extra configuration outside of Dynamic Intelligence Manager (for example: external services sending intelligence to an input module).
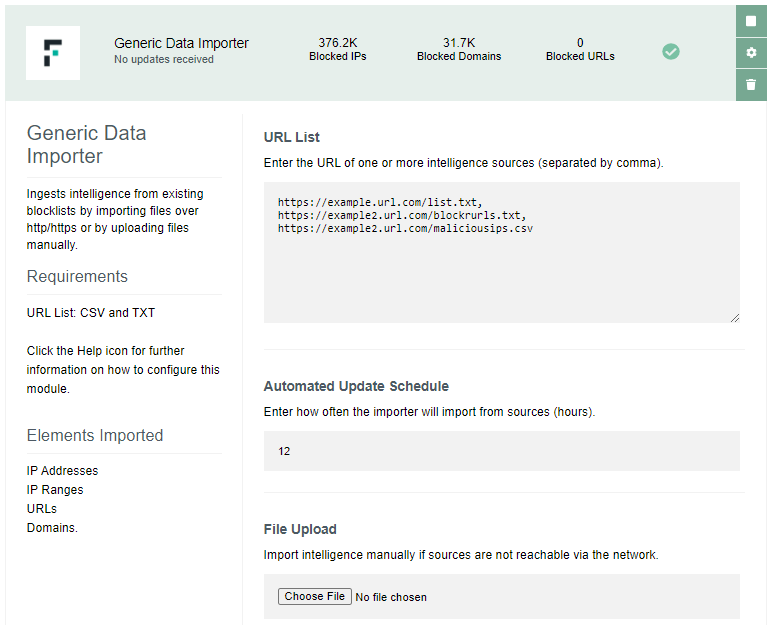
Generic Data Importer
This import module ingests intelligence from existing blocklists by importing files in TXT or CSV format over http/https, or by uploading files manually. Import is automated and performed at regular intervals, import interval is defined by the user in the settings of the module.
This module imports the following elements:
-
IP addresses
-
URLs
-
Domains
-
Snort Rules
This module requires the following settings:
-
one or more URLs of intelligence sources (each entry separated by comma) or
-
one file containing elements
TAXII Feed Connector
This import module ingests intelligence by connecting to one or more TAXII 2.0 feeds and receiving elements distributed using the STIX 2.0 format.
This module imports the following elements:
-
IP addresses
-
URLs
-
Domains
This module requires the following settings:
-
one or more URLs of TAXII 2.0 feeds (each entry separated by comma)
-
for feeds with multiple sub-feeds, the API Root used in each feed to serve findings in STIX format. Default/first feed will be used if no API Root is specified. More information on usage of API Root is available at this link: https://oasis-open.github.io/cti-documentation/taxii/intro.html
-
for feeds requiring authentication, the username and password (each entry separated by comma, ordered with the same order of the feed URLS)
Please note
-
If the feed URL redirects to a different URL, make sure you use the actual URL after the redirection (the one that points directly to the feed).
-
URLs entered in the module configuration must start with or
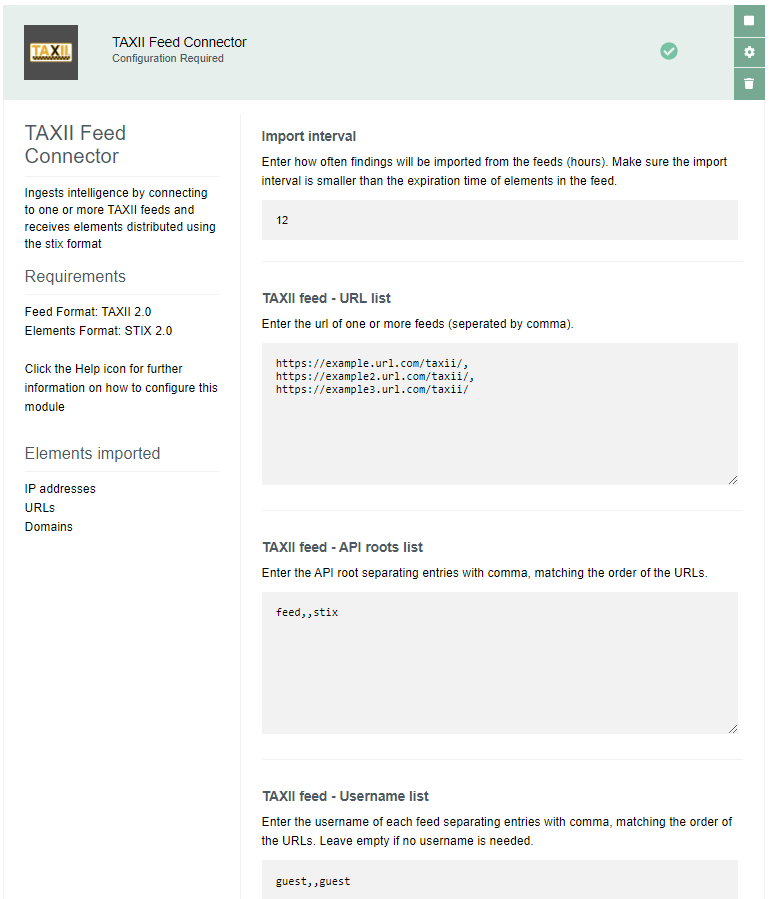
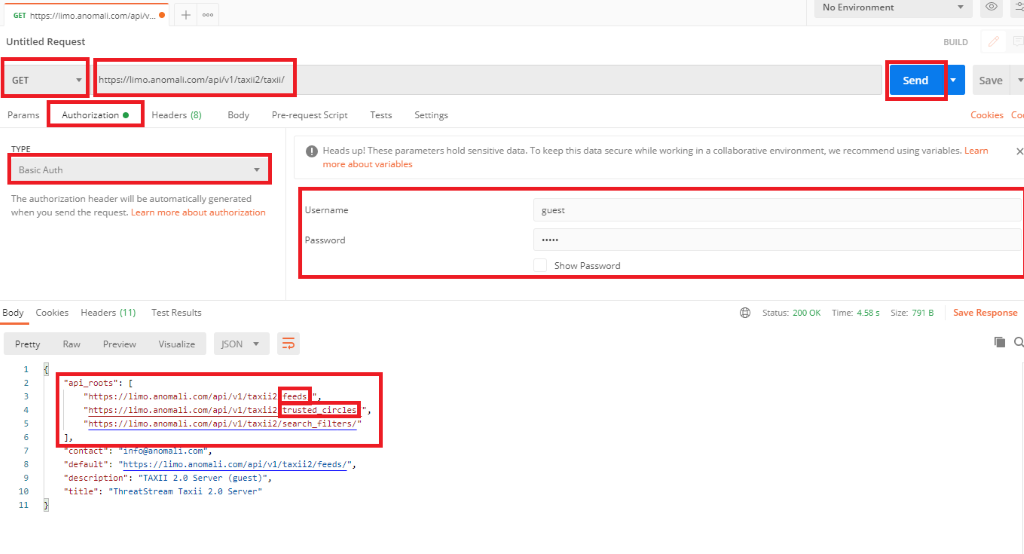
In the example visible in the picture, the 2nd feed listed in the URL list field uses the default feed and requires no authentication: this is why both API roots list and Username list have no entries between the first and third value.
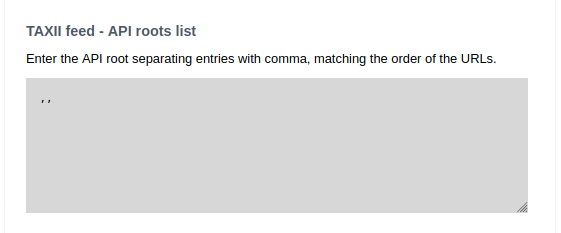
There’s also an option to leave all the feeds blank for TAXII feed – API roots list if the user wants to use the defaults. In that case, the input would look like below: commas would still have to be provided without any space inbetween.
If a default is not configured any of the feeds configured within the module, it is possible to identify the API roots using any tool capable to perform API operations as described in the Appendix of this document.
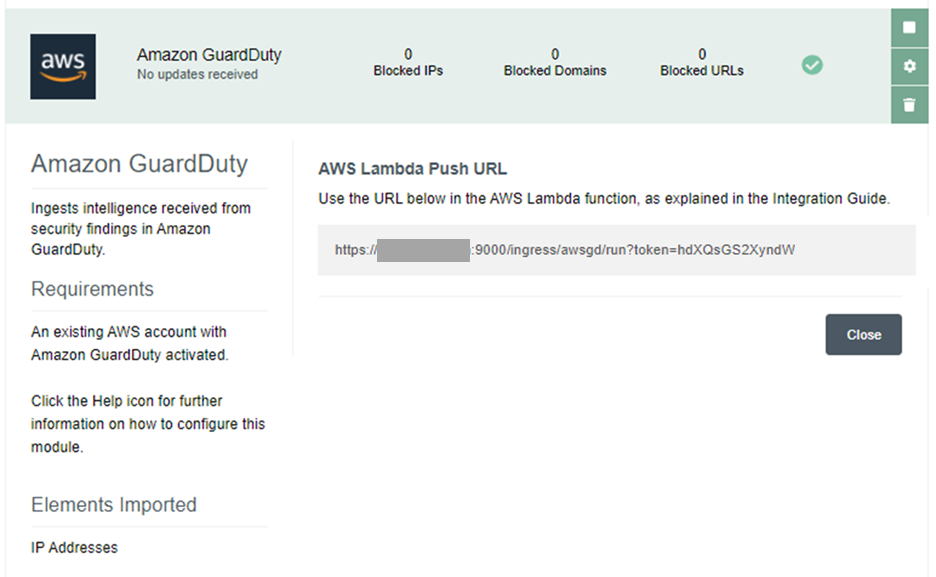
Amazon GuardDuty
This import module ingests security findings identified by Amazon GuardDuty, by exposing an API endpoint that will receive findings sent by an AWS Lambda function configured to export findings to Dynamic Intelligence Manager. The AWS Lambda function will be triggered using AWS CloudWatch as soon as a new finding is generated by AWS GuardDuty.
This module imports the following elements:
- IP addresses
and requires the following settings:
-
Amazon GuardDuty activated within the AWS account
-
the AWS Lambda Push URL displayed in the configuration UI of the module: this is automatically generated when the module is installed. In order to receive findings from Amazon GuardDuty, the hostname assigned to Dynamic Intelligence Manager (during the installation stage) must be resolvable and reachable from the AWS Lambda function.
To enable events to be sent from Amazon GuardDuty to the import module, the following files are necessary:
-
fp-ngfw-aws-guardduty-lambda-v1.zip available at this link: https://frcpnt.com/fp-ngfw-aws-guardduty-lambda-latest
-
fp-ngfw-aws-guardduty-cloudformation-v1.zip available at this link: https://frcpnt.com/fp-ngfw-aws-guardduty-cloudformation-latest
Follow these steps to configure the services on AWS:
-
Download both required files to a folder on a local machine.
-
Extract fp-ngfw-aws-guardduty-cloudformation-v1.zip which contains fp-ngfw-aws-guardduty-cloudformation-v1
-
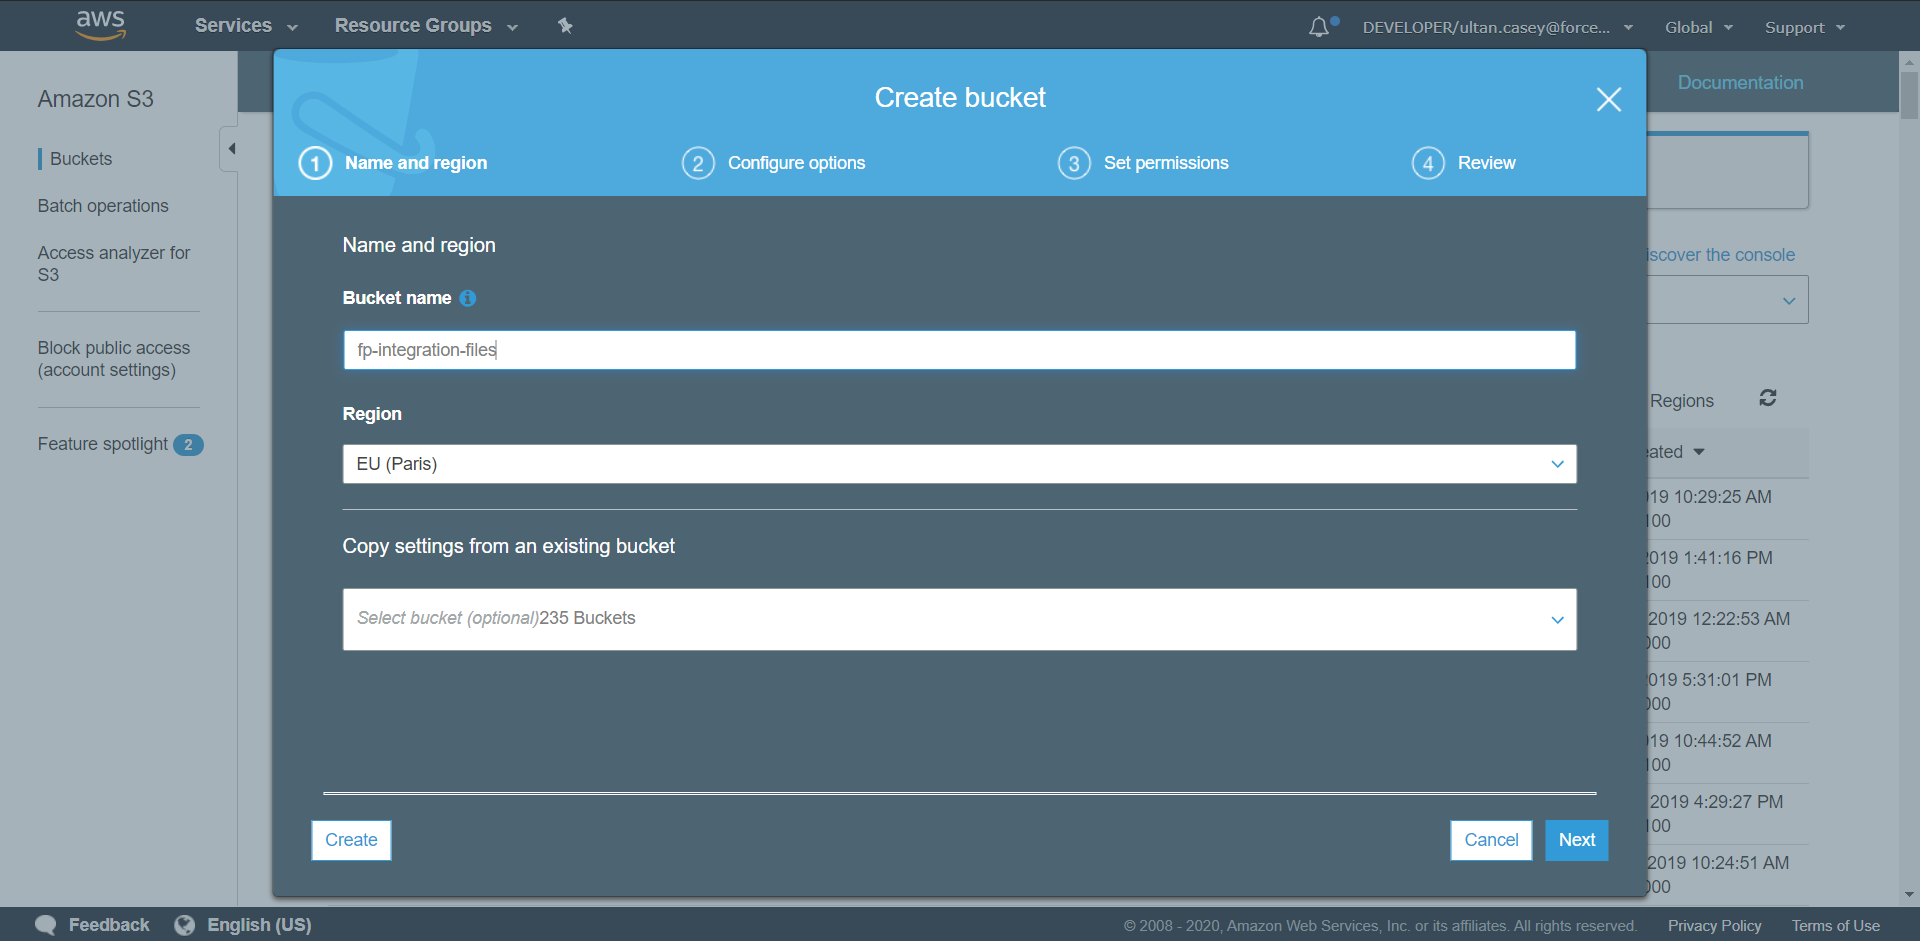
Navigate to the AWS management console and from there open the S3 control panel.
-
Click on Create Bucket. Set the name of the bucket to fp-integrations-files and leave the rest as default. Click Create.
-
Navigate to the newly created bucket and click Create Folder and name it functions. Open this folder and select Upload. Drag the fp-ngfw-aws-guardduty-lambda-v1.zip file into the upload window and select Upload.
-
Return to the AWS Management Console and from there search for and open CloudFormation.
-
Click Create Stack and from the dropdown select With new resources (standard).
-
Leave the Prepare Template field as default and under Specify Template select Upload a Template File. Upload the fp-ngfw-aws-guardduty-cloudformation-v1 file extracted earlier. Click Next.
-
Set the stack name to ForcepointDIM-GuardDuty. Under parameters update the SMC Endpoint using the value displayed in the AWS Lambda Push URL inside the configuration UI of the GuardDuty module
Leave all other parameters as default and click Next.
-
On the next page click Next.
-
On the last page select I acknowledge that AWS CloudFormation might create IAM resources and click Create Stack to kick off the deployment of all the resources. This may take up to five minutes to deploy.
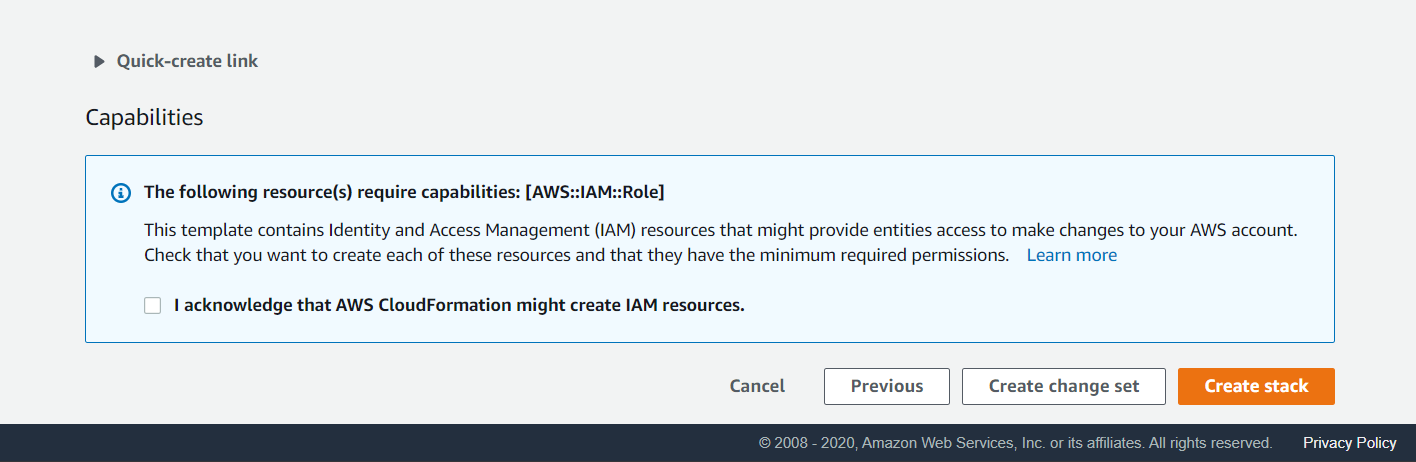
Once the deployment is completed, new findings from Amazon GuardDuty will be pushed to Dynamic Intelligence Manager as soon as they are generated.
To narrow down the source IP of the findings sent by the AWS Lambda function, the AWS Lambda function must be associated to a VPC with a NAT Gateway (or NAT instance) so that the source IP will be the public IP associated to the NAT. To perform this further configuration, please follow the AWS documentation at this link: https://aws.amazon.com/premiumsupport/knowledge-center/internet-access-lambda-function/
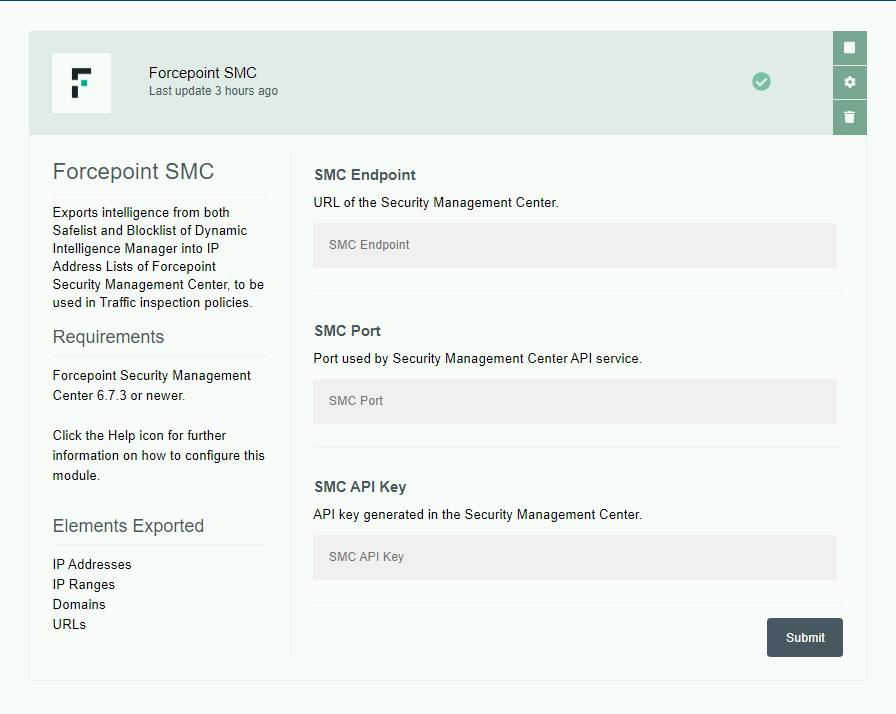
Forcepoint SMC
This export module creates two IP Address Lists and two URL List into the Forcepoint Security Management Center, and at every run adds new elements present in the Safelist and Blocklist of Dynamic Intelligence Manager to the IP Address Lists and URL List inside the SMC. The IP Address Lists can then be configured by the user in Traffic inspection policies assigned to one or more NGFW engines.
This module imports the following elements:
-
IP addresses
-
IP ranges
-
URLs
-
Domains
-
Snort Rules
and requires the following settings:
-
URL of the Security Management Center: this must be reachable from the machine hosting Dynamic Intelligence Manager.
-
Port assigned to the SMC API service of the Security Management Center.
-
SMC API Key: this is generated within the Security Management Center in the configuration of the API service.
Elements consisting of IP addresses or IP ranges are sent to the SMC in batches of maximum 5000 elements into IP Address Lists:
-
dim_blocklist stores IP/IP range elements of the Blocklist of Dynamic Intelligence Manager.
-
dim_safelist stores IP/IP range elements of the Safelist of Dynamic Intelligence Manager.
The two IP Address Lists are created at the first run of the export module.
Elements consisting of URLs or domains are sent to the SMC in batches of maximum 5000 elements into URL List:
-
dim_url_blocklist stores URL/Domain elements of the Blocklist of Dynamic Intelligence Manager.
-
dim_url_safelist stores URL/Domain elements of the Safelist of Dynamic Intelligence Manager.
The two URL List are created at the first run of the export module.
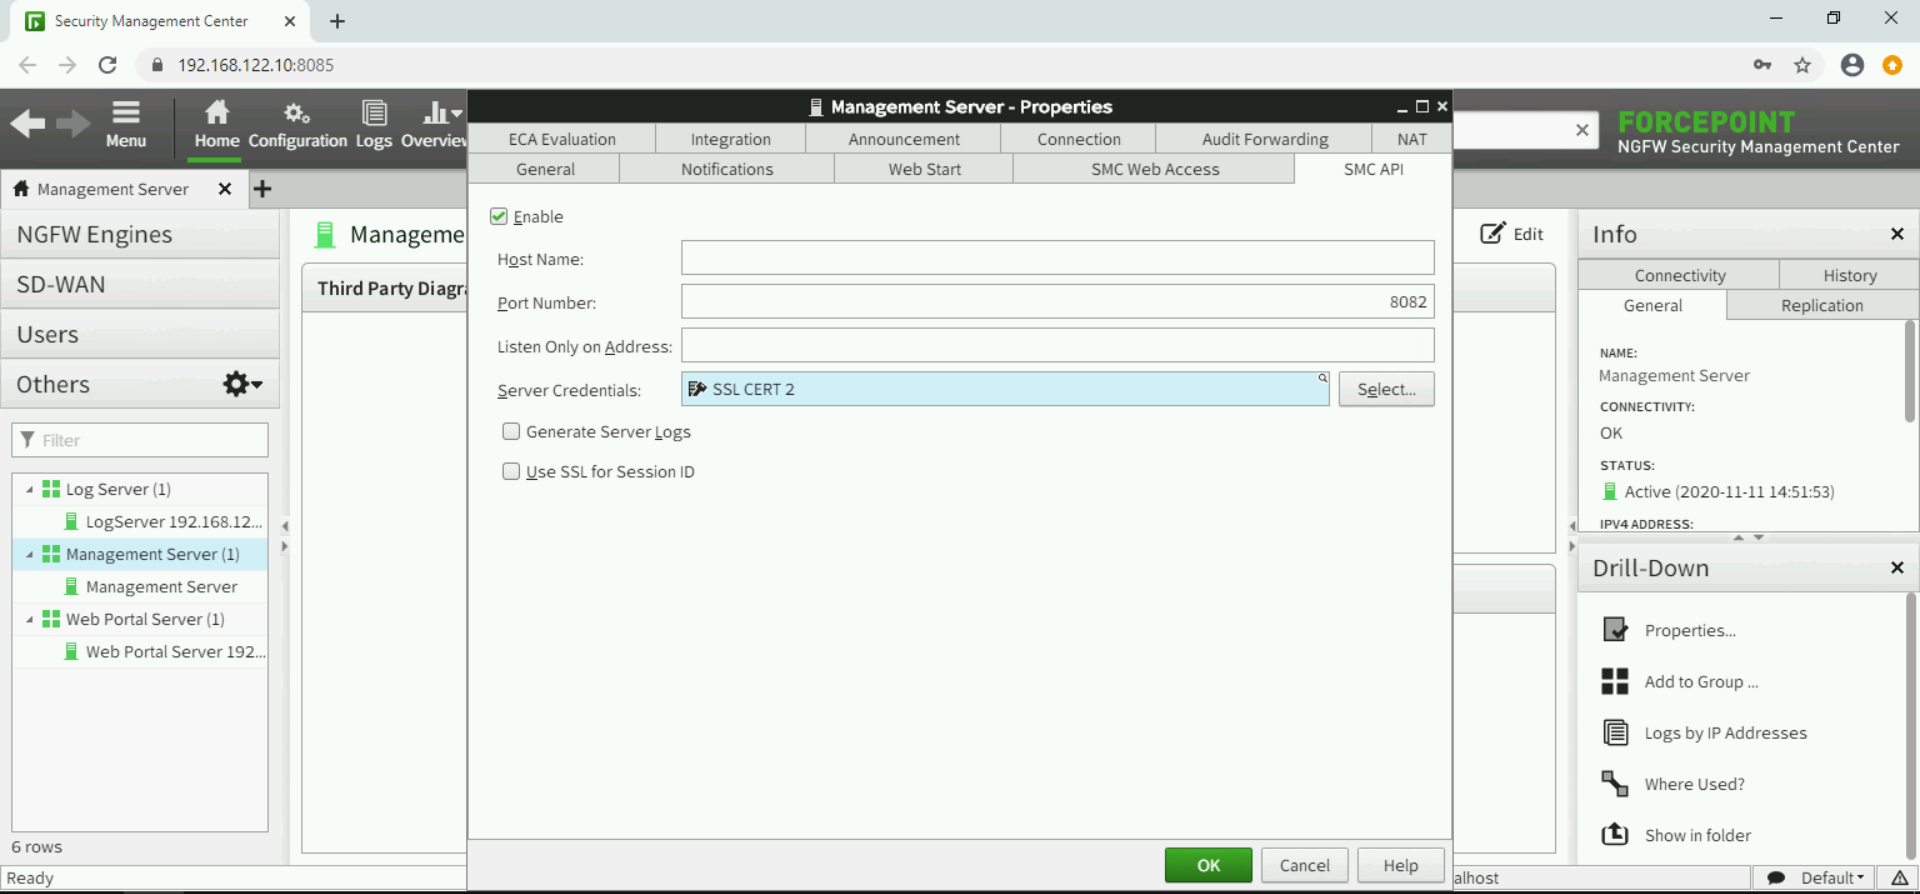
Make sure configuration of SMC API service in Forcepoint Security Management Center has Use SSL for Session ID disabled, this setting is inside the Forcepoint Security Management Center console under Home > Others > Management Server > SMC API.
Connection to SMC will fail (and errors will be visible in the Logs tab of Dynamic Intelligence Manager) if self-signed certificates are used by the SMC API service. To accept self-signed certificates
- Log into the DIM host
- Copy the SSL certificates into DIM/fp-smc/certs folder
- Restart the Forcepoint SMC module using the DIM web interface (click stop then click after a few seconds to start)
Further details on how to configure the SMC API service can be found in the official documentation at this link http://help.stonesoft.com/onlinehelp/StoneGate/SMC/6.8.0/index.html
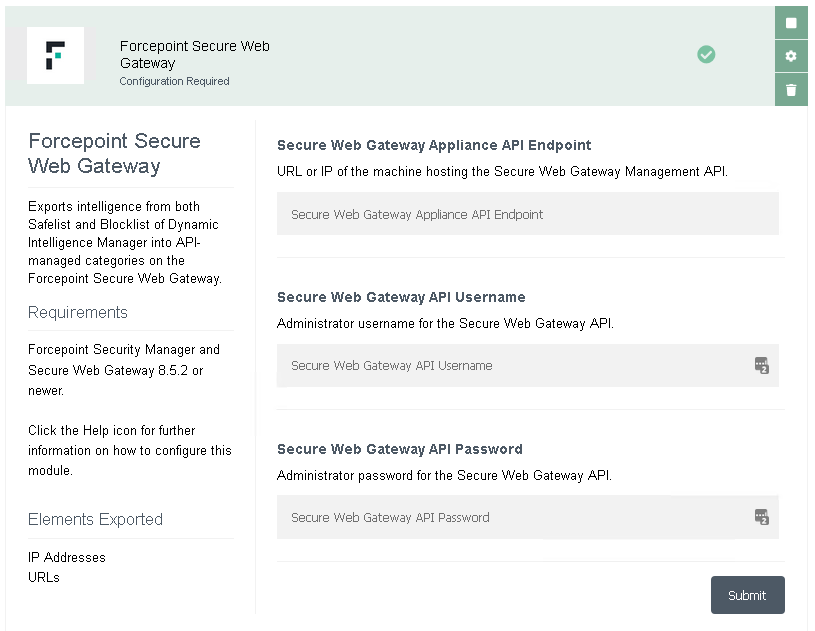
Forcepoint Secure Web Gateway
This export module creates four categories in the Forcepoint Security Manager, and at every run adds new elements present in the Safelist and Blocklist of Dynamic Intelligence Manager to those categories. The IP Address Safelist and Blocklist, together with the URL Safelist and Blocklist, can then be used inside Secure Web Gateway policies configured in the Forcepoint Security Manager (Web tab).
This module imports the following elements:
-
IP addresses
-
URLs
and requires the following settings:
-
URL or IP of the machine hosting the Forcepoint Secure Web Gateway Management API: this must be reachable from the machine hosting Dynamic Intelligence Manager.
-
Secure Web Gateway API Username and Password: created by the Forcepoint Security Manager super administrator, requires the Management API to be installed.
Further details on how to install and configure the Secure Web Gateway/Forcepoint Security Manager API service can be found in the official documentation at this link: https://www.websense.com/content/support/library/web/v85/mgmt_api_install/install_guide.pdf
Elements are sent to the Secure Web Gateway in batches of maximum 5.000 elements into IP Address and URL Safelists & Blocklists:
-
DIM – URL Safelist stores all URL elements of the Safelist of Dynamic Intelligence Manager.
-
DIM – URL Blocklist stores all URL elements of the Blocklist of Dynamic Intelligence Manager.
-
DIM – IP Address Safelist stores all IP Address elements of the Safelist of Dynamic Intelligence Manager.
-
DIM – IP Address Blocklist stores all IP Address elements of the Blocklist of Dynamic Intelligence Manager.
The four lists are created at the first run of the export module.
NOTE: the Management API service has only one user and only one connection is allowed at any given time. If the service is used to integrate Secure Web Gateway with other products, it is possible that concurrent requests are denied login. This module has an automated retry mechanism to handle errors due to this limitation.
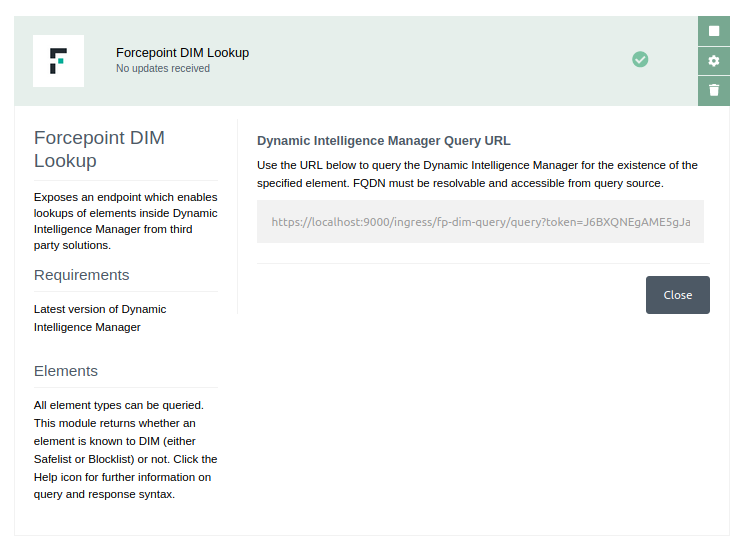
Forcepoint DIM Lookup
This export module exposes an endpoint on the Dynamic Intelligence Manager instance which allows the current blocklist and safelist to be queried for entries. If a value currently exists as an element within the elements lists it is returned, and if not an error is returned. This module requires the latest version of the Dynamic Intelligence Manager to be installed.
This module exposes the following elements:
-
IP addresses
-
URLs
-
Domains
-
Ranges
Queries to the module are sent as a GET request to the following endpoint:
http://<IP_OR_FQDN_OF_DIM_INSTANCE>:9000/ingress/lookup?token=<TOKEN_GENERATED_BY_MODULE>&query=<ELEMENT_BEING_QUERIED>
This address can be retrieved on the UI of Dynamic Intelligence Manager once installed. An example is displayed below:
Examples of queries are as follows:
Domain
http://dim.domain.com:9000/ingress/lookup?token=ghYju36H78ghwRf5&query=jim.com
URL
http://dim.domain.com:9000/ingress/lookup?token=ghYju36H78ghwRf5&query=http://jim.com/testing/url
IP Address
http://dim.domain.com:9000/ingress/lookup?token=ghYju36H78ghwRf5&query=187.56.32.45
IP Range
http://dim.domain.com:9000/ingress/lookup?token=ghYju36H78ghwRf5&query=229.23.145.45-229.23.145.67
When a query is successful and an element exists within the Dynamic Intelligence Manager the data returned is in the following format:
{
  "status": 200,
  "message": {
    "type": 0,
    "value": "http://test.com",
    "list": "Blocklist"
  }
}
Otherwise if a query fails due to an error or incorrect value being sent, the response returned is in the following format:
{
  "status": 404,
  "message": "Value does not exist in Dynamic Intelligence Manager."
}
Troubleshooting
Follow these steps to identify issues impacting the normal operation of the integration described in this document.
Validate the prerequisites
Make sure the prerequisites described in the Summary chapter are all satisfied:
-
Make sure the docker host or underlying machine has at least 2 CPUs and 2 GB of RAM.
-
Docker images for this integration have been tested with Docker 19.03.6 and Docker-compose 1.22.0
-
Verify port 443/TCP is reachable from the machines that will browse the web interface of Dynamic Intelligence Manager: browse the FQDN defined for Dynamic Intelligence Manager at deployment time and verify the web interface is displayed.
-
Verify the DNS name used in HOST_DOMAIN within the docker-compose.yml file is resolvable from outside the organization, and port 9000/TCP is reachable from the sources of intelligence being sent to the input modules, if using input modules receiving intelligence from external products or services.
-
Validate the certificates are generated. In the controller folder, user should see 2 files fullchain.pem and privkey.pem in the directory data/certbot/conf/live/<HOST_DOMAIN>/
-
Check the user can download the necessary files with the following commands:
wget –content-disposition https://frcpnt.com/fp-dim-latest
Check network connectivity
Make sure firewalls or other security appliances are not impacting the network connectivity necessary for the operation of all components involved in this integration:
-
Check the host machine has internet connectivity: execute the following command on the host machine:
ping -c 2 www.aws.com
Check the result is similar to below:
PING www.aws.com (10.10.120.12) 56(84) bytes of data.
64 bytes from 10.10.120.12 (10.10.120.12): icmp_seq=1 ttl=128 time=179 ms
64 bytes from 10.10.120.12 (10.10.120.12): icmp_seq=1 ttl=128 time=181 ms
-
Check user has access to docker.frcpnt.com: execute the following command on the host machine:
cat ~/.docker/config.json
If the user has successfully logged into the docker repo they should have an entry similar to:
{
    "auths": {
        "docker.frcpnt.com": {
            "auth": "<auth-hash-here>"
        }
    },
    "HttpHeaders": {
        "User-Agent": "Docker-Client/19.03.8 (linux)"
    }
}
Check dependencies are installed
Make sure the software dependencies needed by the components involved into this integration are installed:
-
Check the host machine has docker installed. Execute the following command on the host machine:
docker info
Check the first few lines of the output are similar to below:
Client:
Debug Mode: false

Server:
Containers: 3
  Running: 2
  Paused: 0
  Stopped: 1
Images: 3
Server Version: 19.03.6
-
Check the host machine has docker-compose installed. Execute the following command on the host machine:
docker-compose –version
Check the docker-compose version is 1.22.0 or higher
Check all components are configured and running properly
Make sure the products and services involved into this integration are configured as expected and they are running:
-
Check the docker images are running. Execute the following command:
docker ps –format ‘{{.Names}}’
Check the output is similar to below:

- If any of the containers are not currently running, the following command should restart the Dynamic Intelligence Manager:
docker-compose down & docker-compose up -d
Appendix – Custom Modules
Beside modules developed and made available by Forcepoint via the Marketplace of Dynamic Intelligence Manager, users can develop custom modules that can be deployed manually inside their local instance.
Modules are language agnostic: they can be written in any language as long as the resulting module abides to the API contracts described in this chapter. All modules developed by Forcepoint are written in Go or Python, due to ease of development, performance and reusability and then built into docker images for portability.
Required files
Custom modules, same as Marketplace modules, require a few default files in order to operate and be displayed within an existing instance of Dynamic Intelligence Manager.
-
Create a new directory for your custom Dynamic Intelligence Manager module on your docker host machine. For consistency we suggest creating the folder in the project root folder with the other installed module folders. The folder is to contain all files necessary to launch, configure and maintain the custom module.
-
Create a file named docker-compose.yml, this is necessary to launch the module. If the custom module requires a persistent config, create a config directory and create a config file inside the directory (to store the configuration of the custom module, so that it will persist across launches) and a Dockerfile to generate a docker image.
The following is an example of the contents required for the docker-compose.yml file:
version: '3.5'
services:
  <your_module_name>:
    image: <your_module_docker_image_name>
   environment:
      HOST_DOMAIN: <dim_host_fqdn>
      CONTROLLER_SVC_NAME: dim-controller
      CONTROLLER_PORT: 8080
      MODULE_SVC_NAME: <your_module_name>
      LOCAL_PORT: 8080
    restart: on-failure
    volumes:
      - ${PWD}/config:/config
    networks:
      - controller_module-net

networks:
  controller_module-net:
    external: true
  | Parameter           | Example                            | Description                                                                                                                                                                                         |
  | ------------------- | ---------------------------------- | --------------------------------------------------------------------------------------------------------------------------------------------------------------------------------------------------- |
  | your_module_name    | my-custom                          | Service name for the custom module. This must be all lowercase and contain no spaces. This is used as a unique identifier by docker.                                                                |
  | image               | dim.mydomain.com/modules/my-custom | Docker image name for the image generated when you build your module from your Dockerfile.                                                                                                          |
  | environment         |                                    | Environment variables required by your module, see below.                                                                                                                                           |
  | INTERNAL_TOKEN      | ky62fg278hsj3kkhsmalx              | The registration token provided by your Dynamic Intelligence Manager instance. This can be retrieved by browsing the web UI and the **Settings** \> **Registration Token**.                         |
  | HOST_DOMAIN         | dim.mydomain.com                   | The FQDN of the host machine on of the Dynamic Intelligence Manager.                                                                                                                                |
  | CONTROLLER_SVC_NAME | dim-controller                     | By default the service name of the Dynamic Intelligence Manager is **dim-controller**. This is defined in the **docker-compose.yml** file of your DIM instance as configured at installation stage. |
  | CONTROLLER_PORT     | 8080                               | The port on which the DIM controller is being run. Default is 8080.                                                                                                                                 |
  | MODULE_SVC_NAME     | my-custom                          | Service name for your Dynamic Intelligence Manager module. Best to keep this the same as your service name for docker as defined above.                                                             |
  | LOCAL_PORT          | 8080                               | Port on which the modules webserver is being run.                                                                                                                                                   |
- Replace the variables within this docker-compose.yml file with those relevant to your module and your Dynamic Intelligence Manager installation. These information will enable you to launch your module and connect it into the DIM docker networks.
Registering the module
Next step is to begin the development of your module. When a module first launches it must register with the Dynamic Intelligence Manager to enable it to interact with the DIM and for the DIM controller to interact with your module.
In order to do this, from the docker host machine send the module metadata in a POST request to the controller’s internal register endpoint: http://<CONTROLLER_SVC_NAME>:<CONTROLLER_PORT>/internal/register replacing the parts in red with the actual values of your local installation.
{
   "module_service_name":"<module_name_no_spaces>",
   "module_display_name":"<module_display_name>",
   "icon_url":"<url_to_module_icon>",
   "module_type":"<ingress/egress>",
   "module_description":"<description_of_module>",
   "inbound_route":"/<your_module_svc_name>",
   "internal_ip":“0.0.0.0”,
   "internal_port":"<your_module_server_port>",
   "configured":"<true/false>",
   "configurable":"<true/false>",
   "accepted_elements_types":[
      "IP",
      "DOMAIN",
      "URL",
      "RANGE"
   ],
   "internal_endpoints":[
      {
         "secure":"<true/false>",
         "endpoint":"/<endpoint_name>",
         "http_methods":[
            "GET",
            "“POST”…"
         ]
      }
   ]
}
Details of the module metadata are in the following table.
| Parameter | Example | Description |
|---|---|---|
| module_svc_name | my-custom | Service name for the module being developed. This should be all lowercase and contain no spaces. This is used as a unique identifier by the DIM controller. |
| module_display_name | My Custom Module | The display name for the module on DIM UI elements. This may contain spaces. |
| icon_url | http://dimdomain.example.com/icon.png | URL to a square icon file for the Dynamic Intelligence Manager. The icon maximum size is 500x500px. |
| module_type | ingress / egress | Ingress – Ingests elements/intelligence into the Dynamic Intelligence Manager. Egress – Exports elements/intelligence from the Dynamic Intelligence Manager to external sources. |
| module_description | Lorem ipsum dolor sit amet… | Description of your module and its features, this will be displayed in the Info tab of the module within the Marketplace |
| inbound_route | /my-custom | The route upon which requests to this module are sent. This are reverse proxied through the DIM controller. Should be similar to the module service name appended to a forward slash. |
| internal_port | 5000 | For DIM to interact with your module you need to implement a web server within it. This is the port on which the web server is running. |
| configured | false | Indicate to the controller and the UI whether your module is currently configured. On launch of the module this should be validated and altered based on the modules state. |
| configurable | false | Indicate whether the module requires configuration. |
| accepted_elements_types | [“IP”, “RANGE”] | All or a subset of the following array [“IP”, “RANGE”, “DOMAIN”, “URL”]. Indicates to the controller which elements are accepted by the module. |
| internal_endpoints | [endpoint1, endpoint2] | These are the endpoints that are supported by the module, i.e. run, config and health. This tells the controller which endpoints can be forwarded to |
Parameters for the internal_endpoints are described in the following table.
| Parameter | Example | Description |
|---|---|---|
| secure | true | Indicates whether the endpoint is secure/requires authentication with the UI header. By default, all endpoints should be secure. |
| endpoint | /config | The route for the endpoint. |
| http_methods | [“GET”, “POST”] | Array of accepted methods on the module’s endpoint. |
Module Endpoints
Once a module is registered most interactions and functionalities of the system are handled using a webserver contained within the module. In this section we will go over the endpoints required and the functionality needing to be implemented on those endpoints.
For most modules, only three endpoints are necessary: the /config, /health and /run.
-
The /config endpoint enables Dynamic Intelligence Manager to send a GET request to retrieve all configuration fields and display them on the UI, or POST back a configuration to be parsed and stored by the module.
-
The /health endpoint allows the controller to send a GET request to the module to verify that it is currently up and running.
-
The /run endpoints functionality varies depending on the module type. For an egress module it would normally accept batches of elements from the controller to be parsed and sent to the external service is designed to export elements to, whereas for an ingress module its functionality can vary from accepting file uploads, URLs, data streamed to its endpoint. Depending on the purpose of the module, this endpoint might not be implemented at all.
Configuration Endpoint
Let’s begin with the /config endpoint, retrieving the fields for the Dynamic Intelligence Manager UI: each variable stored within the config.yml file which must be configured should have a corresponding field returned on the endpoint. When the Dynamic Intelligence Manager sends a GET request to the config endpoint, these fields are retrieved and dynamically displayed on the UI. The format of these fields is described below along with the array of field types.
{
   "fields":[
      {
         "label":"SMC API Key",
         "type":1,
         "expected_json_name":"smc_api_key",
         "rationale":"API Key for connecting to the Forcepoint SMC.",
         "value":“ghGDhdSHFshfe2hDAH”,
         "possible_values":[

         ],
         "required":true
      },
      {
         "label":"Blocklist Duration",
         "type":3,
         "expected_json_name":"blocklist_duration",
         "rationale":"Duration for which elements remain on the blocklist.",
         "value":“3600”,
         "possible_values":[
            3600,
            7200,
            10800
         ],
         "required":true
      }
   ]
}
| Parameter | Example | Description |
|---|---|---|
| label | SMC API Key | The label displayed above the field in the DIM UI. |
| type | 6 | There are several accepted field types for DIM. Those are: 1 - Text 2 - Select 3 - Radio 4 - Number 5 - Password 6 - Disabled 7 - Info – Displayed on the sidebar. 8 - FileUpload 9 - TextArea |
| expected_json_name | smc_api_key | Field name expected in the POSTed configuration from the DIM UI. |
| rationale | Access to the SMC requires a valid API Key. Please provide one in the field below. | Description of the field and valid values for the field. |
| value | jhgfgahuisSASQwehuifwehiuYDsdf | A default value for the field, or if already configured, the current value for the field. |
| possible_values | [10, 20, 30] | An array of possible values, used for the SELECT and RADIO field types to display multiple options. |
| required | true | Flag indicating whether or not a field is required to be filled before submission. |
When users modify the values in the configuration fields within the UI of Dynamic Intelligence Manager and click Submit, a POST request is sent back to the /config endpoint with those values. It is up to the module to then parse, validate and store the values. The format returned to the module is defined below, with each value being submitted with its expected json name as defined in the configuration fields.
{
   "values":{
      "<expected_json_name>":"<value>",
      "<expected_json_name>":"<value>",
      "<expected_json_name>":"<value>"
   }
}
Upon receiving the submitted configuration, the module should validate the submitted values, and if all fields are valid and successfully entered then send a new registration request to the controller with the configured flag set to true, indicating that the module is now configured.
Health Endpoint
Dynamic Intelligence Manager controller uses the /health endpoint to verify the health status of a given module.
A GET request to this endpoint is sent, and the response indicates the modules status: a status code 200 response is considered healthy, whereas any other status code sets the module to unhealthy in the controller. In developing a module, you may implement any relevant health check code here which confirms the validity of the configuration or checks the modules connectivity to an external service.
Run Endpoint
There are two primary instances in which the /run endpoint should be implemented:
-
if the module is an egress module, to export the elements from the Dynamic Intelligence Manager to their destination
-
if the module is an ingress module, to import or receive elements pushed from external sources
If the module is an egress module used to export the Dynamic Intelligence Manager intelligence, then the /run endpoint must accept an array of elements POSTed to it in the following format, parse it and convert it to the required format of the external service.
{
   "values":[
      {
         "source":"AWS GuardDuty",
         "service_name":"aws-gd",
         "type":"IP",
         "value":"212.34.22.33",
         "batch_number":6
      },
      {
         "source":"AWS GuardDuty",
         "service_name":"aws-gd",
         "type":"IP",
         "value":"278.11.11.11",
         "batch_number":6
      }
   ]
}
| Parameter | Example | Description |
|---|---|---|
| source | AWS GuardDuty | Display name of the element source. |
| service_name | aws-gd | Service name of the module which ingested the element. |
| type | IP | Type of the element value. Can be any of IP, RANGE, DOMAIN, URL. |
| value | 111.22.134.11 | Value of the element being sent to the egress module. |
| batch_number | 6 | Elements can be ingested into the DIM in batches. The batch number indicates the batch from which this element was ingested. |
When the DIM controller sends the elements to the module, it sets the batch status to pending. It is then up to the module to inform the controller of any updates to the batch status on the /internal/update endpoint:
-
If a failure in exporting the batch occurs the batch should be set to failed
-
if the export succeeds the status should be set to success
The status updates must be sent in the following format.
{
  "service_name": "fp-smc",
  "status": "failed",
  "update_batch_id": 6
}
| Parameter | Example | Description |
|---|---|---|
| service_name | fp-smc | Service name of the module which is exporting the element. |
| status | success | Updated status for the batch. Can be either success or failed. |
| update_batch_id | 6 | ID number of the batch which has its status being updated. |
If the module expects the external source to push to the /run endpoint rather than DIM pull data, the endpoint must have its secure flag set to false on registration. This indicates to the DIM to not utilise the token system for authentication and to allow it to be accessible on the web. In this situation you may implement any logic you wish and have the pushed data conform to any structure you wish.
Ingesting Data
Ingress modules implement functionality alongside the module webserver which allows them to retrieve or accept external source data, transform it and ingest it into the Dynamic Intelligence Manager. To do so it must be sent to the /internal/queue endpoint and conform to the following format.
{
  "items": [
    {
      "source": "AWS GuardDuty",
      "service_name": "aws-gd",
      "type": "IP",
      "value": "212.34.22.33"
    },
    {
      "source": "AWS GuardDuty",
      "service_name": "aws-gd",
      "type": "IP",
      "value": "278.11.11.11"
    }
    ......
  ]
}
| Parameter | Example | Description |
|---|---|---|
| source | AWS GuardDuty | Display name of the module which is ingesting data into the Dynamic Intelligence Manager blocklist |
| service_name | aws-gd | Unique service name identifier for the module ingesting into the DIM. |
| type | IP | Type of data being ingested into the DIM. This can be one of IP, RANGE, DOMAIN or URL. |
| value | 111.241.41.2 | Value of the data being submitted to the DIM blocklist. |
If the data sent to the Dynamic Intelligence Manager is accepted, a 202 (Accepted) response is returned to the module. This confirms that the data has been successfully added to the DIM blocklist. To verify you may check this on the UI.
Sending Log Events to the Controller
Users of Dynamic Intelligence Manager may wish to view log events for the module after it’s connected to the controller to ensure there are no errors present in the module. To display the log events for the module you may send them to the controller for display on the UI.
Log events are POSTed to the controller on the /internal/logevent endpoint. The format of the data being pushed is defined and described below.
{
  "module_name": "aws-gd",
  "level": "error",
  "message": "There was an error when parsing the request from AWS.",
  "caller": "blah.func",
  "time": "0001-01-01 00:00:00 +0000 UTC"
}
| Parameter | Example | Description |
|---|---|---|
| module_name | aws-gd | Unique service name identifier for the module sending log events into the DIM. |
| level | error | The level of the log event. May be one of info, debug, warning, error or fatal. |
| message | There was an error when parsing the request from AWS. | Log event message for display on the DIM UI. |
| caller | Blah.func | The function in which the log event occurred. |
| time | 0001-01-01 00:00:00 +0000 UTC | The timestamp at which the log event occurred. |
Appendix – Identify API roots in a TAXII feed
Follow these instructions to use Postman to identify the API roots:
-
Create a new GET request
-
Enter the URL of the TAXII feed into the URL field. Make sure the URL is the actual link to the feed, and not a redirect.
If no authorization is required, skip to step 6.
-
Select the Authorization tab
-
Choose Basic Auth from the TYPE drop down
-
Enter the username and password required by the feed
-
Click Send: in the Body tab (you may have to select Pretty to view the data properly) you will see the response.
-
In the section api_roots in the response, you will see the different feeds you can use. At the end of the URLs you will see the feed options, for example feeds, trusted_circles and search_filters. In this case feeds is the API Root to be entered in the configuration of the Taxii module of Dynamic Intelligence Manager